132 KiB
📢 Announcement: v4.0.0 has been released! Including storage architecture refactoring, database optimization, modularization improvements, and more major updates

🚀 Deploy in 30 seconds — Say goodbye to endless scrolling, only see the news you truly care about


![]()
![]()
![]()
中文 | English
This project is designed to be lightweight and easy to deploy
🚨 【Must Read】Important Announcement: v4.0.0 Deployment & Storage Architecture Changes
🛠️ Choose the Deployment Method That Fits You
🅰️ Option 1: Docker Deployment (Recommended 🔥)
-
Features: Most stable and simplest. Data is stored in local SQLite, fully under your control.
-
Best for: Users with their own server, NAS, or an always-on PC.
🅱️ Option 2: GitHub Actions Deployment (Restored ✅)
-
Features: Data is no longer committed directly to the repo. Instead, it is stored in Remote Cloud Storage (supports S3-compatible protocols: Cloudflare R2, Alibaba Cloud OSS, Tencent Cloud COS, etc.).
-
Requirement: You must configure an S3-compatible object storage service (Cloudflare R2 recommended, it's free).
⚠️ Note: If you choose this option, you must complete the following two configuration steps:
1. 🚀 Recommended Start: Use this template
To keep the repository clean and avoid inheriting redundant history, I recommend using Template mode:
-
Click the green [Use this template] button at the top right of the original repository page.
-
Select "Create a new repository".
💡 Why do this?
- Use this template: Creates a brand new, clean repository with no historical baggage.
- Fork: Retains the complete commit history and relationships, consuming more GitHub resources.
2. ☁️ About the Mandatory Remote Storage for GitHub Actions
If you choose Option 2 (GitHub Actions), you must configure an S3-compatible object storage service.
Supported Storage Services:
- Cloudflare R2 (Recommended, generous free tier)
- Other S3-compatible services
⚠️ Configuration Prerequisites (Using Cloudflare R2 as Example):
According to Cloudflare platform rules, enabling R2 requires binding a payment method.
-
Purpose: Identity verification only (Verify Only). No charges will be incurred.
-
Payment: Supports international credit cards or PayPal.
-
Usage: The R2 free tier (10GB storage/month) is sufficient to cover the daily operation of this project. No need to worry about costs.
📑 Quick Navigation
| 🚀 Quick Start | 🤖 AI Analysis | ⚙️ Configuration Guide | 📝 Changelog | ❓ FAQ & Support |
|---|---|---|---|---|
| 🐳 Docker Deployment | 🔌 MCP Clients | 📚 Related Projects | 🪄 Sponsors |
- Thanks to bug reporters, your feedback makes this project better 😉
- Thanks to stargazers, your stars and forks are the best support for open source 😍
- Thanks to followers, your interactions make the content more meaningful 😎
👉 Click to view Acknowledgments (Current 🔥73🔥 supporters)
Infrastructure Support
Thanks to GitHub for providing free infrastructure, which is the biggest prerequisite for this project to run conveniently with one-click fork.
Data Support
This project uses the API from newsnow to fetch multi-platform data. Special thanks to the author for providing this service.
After communication, the author indicated no concerns about server pressure, but this is based on their goodwill and trust. Please everyone:
- Visit the newsnow project and give it a star
- When deploying with Docker, please control the frequency reasonably and avoid being overly greedy
Promotion Support
Thanks to the following platforms and individuals for recommendations (in chronological order)
- Appinn (小众软件) - Open source software recommendation platform
- LinuxDo Community - Tech enthusiasts community
- Ruan Yifeng's Weekly - Influential tech weekly in Chinese tech circle
Community Support
Thanks to financial supporters. Your generosity has transformed into snacks and drinks beside my keyboard, accompanying every iteration of this project
"One-yuan appreciation" has been suspended. If you still want to support the author, please visit the official account article and click "Like Author" at the bottom.
| Supporter | Amount (CNY) | Date | Note |
|---|---|---|---|
| D*5 | 1.8 * 3 | 2025.11.24 | |
| *鬼 | 1 | 2025.11.17 | |
| *超 | 10 | 2025.11.17 | |
| R*w | 10 | 2025.11.17 | Great agent work! |
| J*o | 1 | 2025.11.17 | Thanks for open source |
| *晨 | 8.88 | 2025.11.16 | Nice project |
| *海 | 1 | 2025.11.15 | |
| *德 | 1.99 | 2025.11.15 | |
| *疏 | 8.8 | 2025.11.14 | Great project |
| M*e | 10 | 2025.11.14 | Open source is not easy |
| **柯 | 1 | 2025.11.14 | |
| *云 | 88 | 2025.11.13 | Good project |
| *W | 6 | 2025.11.13 | |
| *凯 | 1 | 2025.11.13 | |
| 对*. | 1 | 2025.11.13 | Thanks for TrendRadar |
| s*y | 1 | 2025.11.13 | |
| **翔 | 10 | 2025.11.13 | Wish I found it earlier |
| *韦 | 9.9 | 2025.11.13 | TrendRadar is awesome |
| h*p | 5 | 2025.11.12 | Support Chinese open source |
| c*r | 6 | 2025.11.12 | |
| a*n | 5 | 2025.11.12 | |
| 。*c | 1 | 2025.11.12 | Thanks for sharing |
| ... | ... | ... | (More 50+ supporters) |
✨ Core Features
Multi-Platform Trending News Aggregation
- Zhihu (知乎)
- Douyin (抖音)
- Bilibili Hot Search
- Wallstreetcn (华尔街见闻)
- Tieba (贴吧)
- Baidu Hot Search
- Yicai (财联社)
- Thepaper (澎湃新闻)
- Ifeng (凤凰网)
- Toutiao (今日头条)
- Weibo (微博)
Default monitoring of 11 mainstream platforms, with support for adding custom platforms.
💡 For detailed configuration, see Configuration Guide - Platform Configuration
Smart Push Strategies
Three Push Modes:
| Mode | Target Users | Push Feature |
|---|---|---|
| Daily Summary (daily) | Managers/Regular Users | Push all matched news of the day (includes previously pushed) |
| Current Rankings (current) | Content Creators | Push current ranking matches (continuously ranked news appear each time) |
| Incremental Monitor (incremental) | Traders/Investors | Push only new content, zero duplication |
💡 Quick Selection Guide:
- 🔄 Don't want duplicate news → Use
incremental- 📊 Want complete ranking trends → Use
current- 📝 Need daily summary reports → Use
dailyFor detailed comparison and configuration, see Configuration Guide - Push Mode Details
Additional Features (Optional):
| Feature | Description | Default |
|---|---|---|
| Push Time Window Control | Set push time range (e.g., 09:00-18:00) to avoid non-work hours notifications | Disabled |
| Content Order Configuration | Adjust display order of "Trending Keywords Stats" and "New Trending News" (v3.5.0 new) | Stats first |
💡 For detailed configuration, see Configuration Guide - Report Configuration and Configuration Guide - Push Window
Precise Content Filtering
Set personal keywords (e.g., AI, BYD, Education Policy) to receive only relevant trending news, filtering out noise.
Basic Syntax (5 types):
- Normal words: Basic matching
- Required words
+: Narrow scope - Filter words
!: Exclude noise - Count limit
@: Control display count (v3.2.0 new) - Global filter
[GLOBAL_FILTER]: Globally exclude specified content (v3.5.0 new)
Advanced Features (v3.2.0 new):
- 🔢 Keyword Sorting Control: Sort by popularity or config order
- 📊 Display Count Limit: Global config + individual override for flexible control
Group-based Management:
- Separate with blank lines, independent statistics for different topics
💡 Basic Configuration: Keyword Configuration - Basic Syntax
💡 Advanced Configuration: Keyword Configuration - Advanced Settings
💡 You can also skip filtering and receive all trending news (leave frequency_words.txt empty)
Trending Analysis
Real-time tracking of news popularity changes helps you understand not just "what's trending" but "how trends evolve."
- Timeline Tracking: Records complete time span from first to last appearance
- Popularity Changes: Tracks ranking changes and appearance frequency across time periods
- New Detection: Real-time identification of emerging topics, marked with 🆕
- Continuity Analysis: Distinguishes between one-time hot topics and continuously developing news
- Cross-Platform Comparison: Same news across different platforms, showing media attention differences
💡 Push format reference: Configuration Guide - Push Format Reference
Personalized Trending Algorithm
No longer controlled by platform algorithms, TrendRadar reorganizes all trending searches:
- Prioritize High-Ranking News (60%): Top-ranked news from each platform appears first
- Focus on Persistent Topics (30%): Repeatedly appearing news is more important
- Consider Ranking Quality (10%): Not just frequent, but consistently top-ranked
💡 Weight adjustment guide: Configuration Guide - Advanced Configuration
Multi-Channel Real-Time Push
Supports WeWork (+ WeChat push solution), Feishu, DingTalk, Telegram, Email, ntfy, Bark, Slack — messages delivered directly to phone and email.
📌 Multi-Account Push Notes (v3.5.0 New Feature):
- ✅ Multi-Account Configuration Support: All push channels (Feishu, DingTalk, WeWork, Telegram, ntfy, Bark, Slack) support configuring multiple accounts
- ✅ Configuration Method: Use English semicolon
;to separate multiple account values - ✅ Example: Set
FEISHU_WEBHOOK_URLSecret value tohttps://webhook1;https://webhook2 - ⚠️ Paired Configuration: Telegram and ntfy require paired parameter quantities to match (e.g., token and chat_id both have 2 values)
- ⚠️ Quantity Limit: Default maximum 3 accounts per channel, exceeded values will be truncated
Flexible Storage Architecture (v4.0.0 Major Update)
Multi-Backend Support:
- ☁️ Remote Cloud Storage: GitHub Actions environment default, supports S3-compatible protocols (R2/OSS/COS, etc.), data stored in cloud, keeping repository clean
- 💾 Local SQLite: Traditional SQLite database, stable and efficient (Docker/local deployment)
- 🔀 Auto Selection: Auto-selects appropriate backend based on runtime environment
Data Format Hierarchy:
| Format | Role | Description |
|---|---|---|
| SQLite | Primary storage | Complete data with statistics information |
| TXT | Human-readable backup | Optional text records for manual viewing |
| HTML | Web report | Beautiful visual report (GitHub Pages) |
Data Management Features:
- Auto data cleanup (configurable retention period)
- Timezone support (configurable IANA time zone)
- Cloud/local seamless switching
💡 For storage configuration details, see Configuration Details - Storage Configuration
Multi-Platform Deployment
- GitHub Actions: Cloud automated operations (7-day check-in cycle + remote cloud storage)
- Docker Deployment: Supports multi-architecture containerized operation
- Local Running: Python environment direct execution
AI Smart Analysis (v3.0.0 New)
AI conversational analysis system based on MCP (Model Context Protocol), enabling deep data mining with natural language.
- Conversational Query: Ask in natural language, like "Query yesterday's Zhihu trending" or "Analyze recent Bitcoin popularity trends"
- 14 Analysis Tools: Date parsing, basic query, smart search, trend analysis, data insights, sentiment analysis, etc.
- Multi-Client Support: Cherry Studio (GUI config), Claude Desktop, Cursor, Cline, etc.
- Deep Analysis Capabilities:
- Topic trend tracking (popularity changes, lifecycle, viral detection, trend prediction)
- Cross-platform data comparison (activity stats, keyword co-occurrence)
- Smart summary generation, similar news finding, historical correlation search
💡 Usage Tip: AI features require local news data support
- Project includes November 1-15 test data for immediate experience
- Recommend deploying the project yourself to get more real-time data
See AI Analysis for details
Zero Technical Barrier Deployment
One-click GitHub Fork to use, no programming required.
30-second deployment: GitHub Pages (web browsing) supports one-click save as image for easy sharing
1-minute deployment: WeWork (mobile notification)
💡 Tip: Want a real-time updated web version? After forking, go to your repo Settings → Pages and enable GitHub Pages. Preview Effect.
Reduce APP Dependencies
Transform from "algorithm recommendation captivity" to "actively getting the information you want"
Target Users: Investors, content creators, PR professionals, news-conscious general users
Typical Scenarios: Stock investment monitoring, brand sentiment tracking, industry trend watching, lifestyle news gathering
| Github Pages Effect (Mobile Adapted, Email Push) | Feishu Push Effect |
|---|---|
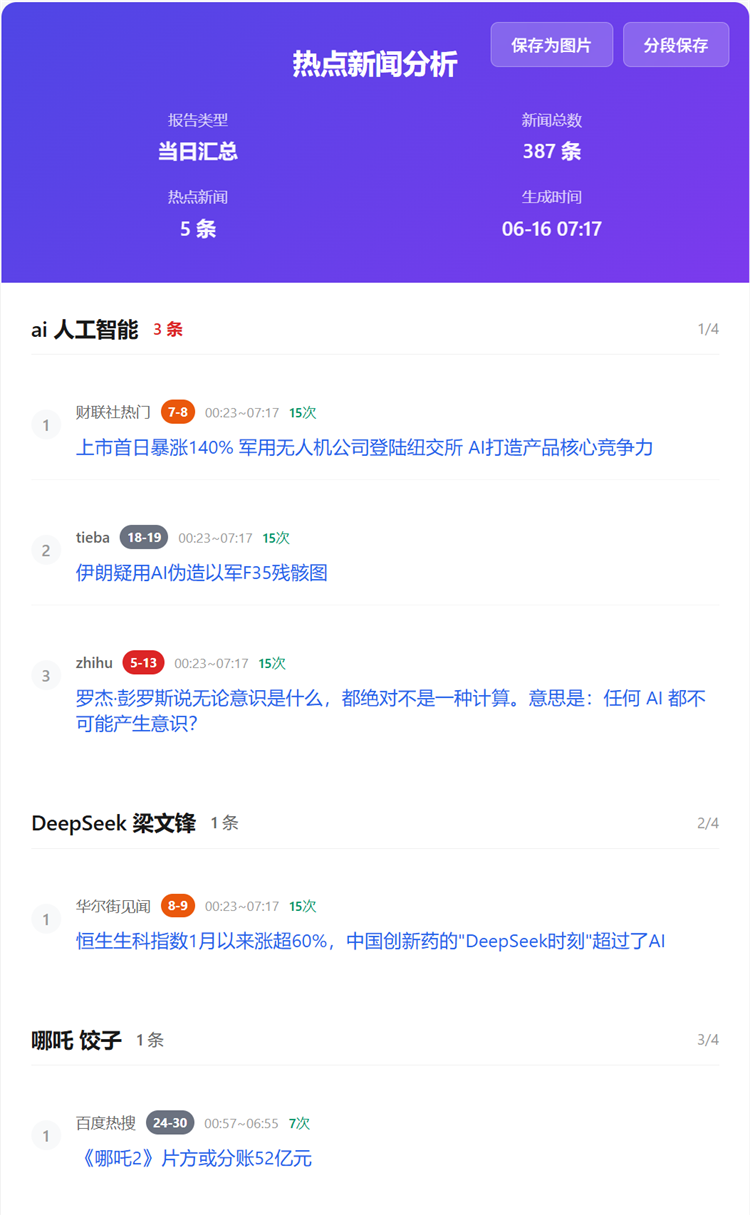 |
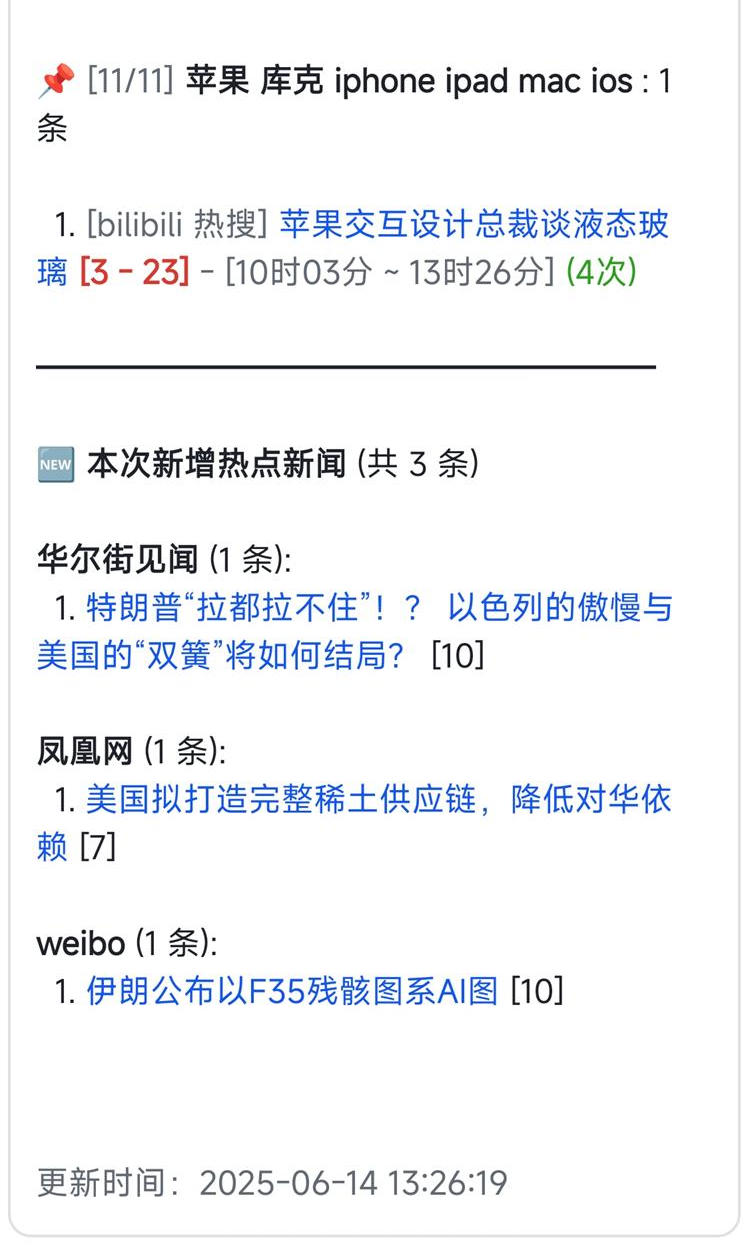 |
📝 Changelog
Upgrade Instructions:
- 📌 Check Latest Updates: Original Repository Changelog
- Tip: Do NOT update this project via Sync fork. Check [Changelog] to understand specific [Upgrade Methods] and [Features]
- Major Version Upgrade: Upgrading from v1.x to v2.y, recommend deleting existing fork and re-forking to save effort and avoid config conflicts
2025/12/13 - v4.0.0
🎉 Major Update: Comprehensive Refactoring of Storage and Core Architecture
- Multi-Storage Backend Support: Introduced a brand new storage module supporting local SQLite and remote cloud storage (S3-compatible protocols, Cloudflare R2 recommended for free tier), adaptable to GitHub Actions, Docker, and local environments.
- Database Structure Optimization: Refactored SQLite database table structures to improve data efficiency and query performance.
- Enhanced Features: Implemented date format standardization, data retention policies, timezone configuration support, and optimized time display. Fixed remote storage data persistence issues to ensure accurate data merging.
- Cleanup and Compatibility: Removed most legacy compatibility code and unified data storage and retrieval methods.
2025/12/13 - mcp-v1.1.0
MCP Module Update:
- Adapted for v4.0.0, while maintaining compatibility with v3.x data.
- Added storage sync tools:
sync_from_remote: Pull data from remote storage to localget_storage_status: Get storage configuration and statuslist_available_dates: List available dates in local/remote storage
👉 Click to expand: Historical Updates
2025/12/03 - v3.5.0
🎉 Core Feature Enhancements
-
Multi-Account Push Support
- All push channels (Feishu, DingTalk, WeWork, Telegram, ntfy, Bark, Slack) support multiple account configuration
- Use semicolon
;to separate multiple accounts, e.g.,FEISHU_WEBHOOK_URL=url1;url2 - Automatic validation for paired configurations (e.g., Telegram's token and chat_id)
-
Configurable Push Content Order
- Added
reverse_content_orderconfiguration option - Customize display order of trending keywords stats and new trending news
- Added
-
Global Filter Keywords
- Added
[GLOBAL_FILTER]region marker for filtering unwanted content globally - Use cases: Filter ads, marketing, low-quality content, etc.
- Added
🐳 Docker Dual-Path HTML Generation Optimization
- Bug Fix: Resolved issue where
index.htmlcould not sync to host in Docker environment - Dual-Path Generation: Daily summary HTML is generated to two locations simultaneously
index.html(project root): For GitHub Pages accessoutput/index.html: Accessible on host via Docker Volume mount
- Compatibility: Ensures web reports are accessible in Docker, GitHub Actions, and local environments
🐳 Docker MCP Image Support
- Added independent MCP service image
wantcat/trendradar-mcp - Supports Docker deployment of AI analysis features via HTTP interface (port 3333)
- Dual-container architecture: News push service and MCP service run independently, can be scaled and restarted separately
- See Docker Deployment - MCP Service for details
🌐 Web Server Support
- Added built-in web server for browser access to generated reports
- Control via
manage.pycommands:docker exec -it trend-radar python manage.py start_webserver - Access URL:
http://localhost:8080(port configurable) - Security features: Static file service, directory restriction, localhost binding
- Supports both auto-start and manual control modes
📖 Documentation Optimization
- Added Report Configuration section: report-related parameter details
- Added Push Window Configuration section: push_window configuration tutorial
- Added Execution Frequency Configuration section: Cron expression explanation and common examples
- Added Multi-Account Push Configuration section: multi-account push configuration details
- Optimized all configuration sections: Unified "Configuration Location" instructions
- Simplified Quick Start configuration: Three core files at a glance
- Optimized Docker Deployment section: Added image description, recommended git clone deployment, reorganized deployment methods
🔧 Upgrade Instructions:
- GitHub Fork Users: Update
main.py,config/config.yaml(Added multi-account push support, existing single-account configuration unaffected) - Docker Users: Update
.env,docker-compose.ymlor set environment variablesREVERSE_CONTENT_ORDER,MAX_ACCOUNTS_PER_CHANNEL - Multi-Account Push: New feature, disabled by default, existing single-account configuration unaffected
2025/11/28 - v3.4.1
🔧 Format Optimization
-
Bark Push Enhancement
- Bark now supports Markdown rendering
- Enabled native Markdown format: bold, links, lists, code blocks, etc.
- Removed plain text conversion to fully utilize Bark's native rendering capabilities
-
Slack Format Precision
- Use dedicated mrkdwn format for batch content processing
- Improved byte size estimation accuracy (avoid message overflow)
- Optimized link format:
<url|text>and bold syntax:*text*
-
Performance Improvement
- Format conversion completed during batching process, avoiding secondary processing
- Accurate message size estimation reduces send failure rate
🔧 Upgrade Instructions:
- GitHub Fork Users: Update
main.py,config.yaml
2025/11/26 - mcp-v1.0.3
MCP Module Update:
- Added date parsing tool resolve_date_range to resolve AI model date calculation inconsistencies
- Support natural language date expression parsing (this week, last 7 days, last month, etc.)
- Tool count increased from 13 to 14
2025/11/25 - v3.4.0
🎉 Added Slack Push Support
-
Team Collaboration Push Channel
- Supports Slack Incoming Webhooks (globally popular team collaboration tool)
- Centralized message management, suitable for team-shared trending news
- Supports mrkdwn format (bold, links, etc.)
-
Multiple Deployment Methods
- GitHub Actions: Configure
SLACK_WEBHOOK_URLSecret - Docker: Environment variable
SLACK_WEBHOOK_URL - Local:
config/config.yamlconfiguration file
- GitHub Actions: Configure
📖 Detailed Configuration Tutorial: Quick Start - Slack Push
- Optimized the one-click installation experience for setup-windows.bat and setup-windows-en.bat
🔧 Upgrade Instructions:
- GitHub Fork Users: Update
main.py,config/config.yaml,.github/workflows/crawler.yml
2025/11/24 - v3.3.0
🎉 Added Bark Push Support
-
iOS Exclusive Push Channel
- Supports Bark push (based on APNs, iOS platform)
- Free, open-source, clean, efficient, ad-free
- Supports both official server and self-hosted server
-
Multiple Deployment Methods
- GitHub Actions: Configure
BARK_URLSecret - Docker: Environment variable
BARK_URL - Local:
config/config.yamlconfiguration file
- GitHub Actions: Configure
📖 Detailed Configuration Tutorial: Quick Start - Bark Push
🐛 Bug Fix
- Fixed issue where
ntfy_server_urlinconfig.yamlwas ignored (#345)
🔧 Upgrade Instructions:
- GitHub Fork Users: Update
main.py,config/config.yaml,.github/workflows/crawler.yml
2025/11/23 - v3.2.0
🎯 New Advanced Customization Features
-
Keyword Sorting Priority Configuration
- Two sorting strategies: Popularity first vs Config order first
- For different use cases: Hot topic tracking or personalized focus
-
Display Count Precise Control
- Global config: Unified limit for all keywords
- Individual config: Use
@numbersyntax to set specific limits - Effectively control push length, highlight key content
📖 Detailed Tutorial: Keyword Configuration - Advanced Settings
🔧 Upgrade Instructions:
- GitHub Fork Users: Update
main.py,config/config.yaml
2025/11/22 - v3.1.1
- Fixed data anomaly crash issue: Resolved
'float' object has no attribute 'lower'error encountered by some users in GitHub Actions environment - Added dual protection mechanism: Filter invalid titles (None, float, empty strings) at data acquisition stage, with type checking at function call sites
- Enhanced system stability to ensure normal operation even when data sources return abnormal formats
Upgrade Instructions (GitHub Fork Users):
- Required update:
main.py - Recommended: Use minor version upgrade method - copy and replace the file above
2025/11/18 - mcp-v1.0.2
MCP Module Update:
- Fix issue where today's news query may return articles from past dates
2025/11/20 - v3.1.0
- Added Personal WeChat Push Support: WeWork application can push to personal WeChat without installing WeWork APP
- Supports two message formats:
markdown(WeWork group bot) andtext(personal WeChat app) - Added
WEWORK_MSG_TYPEenvironment variable configuration, supporting GitHub Actions, Docker, docker compose and other deployment methods textmode automatically strips Markdown syntax for clean plain text push- See "Personal WeChat Push" configuration in Quick Start
Upgrade Instructions (GitHub Fork Users):
- Required updates:
main.py,config/config.yaml - Optional update:
.github/workflows/crawler.yml(if using GitHub Actions) - Recommended: Use minor version upgrade method - copy and replace the files above
2025/11/12 - v3.0.5
- Fixed email sending SSL/TLS port configuration logic error
- Optimized email service providers (QQ/163/126) to default use port 465 (SSL)
- Added Docker environment variable support: Core config items (
enable_crawler,report_mode,push_window, etc.) support override via environment variables, solving config file modification issues for NAS users (see 🐳 Docker Deployment chapter)
2025/10/26 - mcp-v1.0.1
MCP Module Update:
- Fixed date query parameter passing error
- Unified time parameter format for all tools
2025/10/31 - v3.0.4
- Solved Feishu error due to overly long push content, implemented batch pushing
2025/10/23 - v3.0.3
- Expanded ntfy error message display range
2025/10/21 - v3.0.2
- Fixed ntfy push encoding issue
2025/10/20 - v3.0.0
Major Update - AI Analysis Feature Launched 🤖
-
Core Features:
- New MCP (Model Context Protocol) based AI analysis server
- 13 smart analysis tools: basic query, smart search, advanced analysis, system management
- Natural language interaction: Query and analyze news data through conversation
- Multi-client support: Claude Desktop, Cherry Studio, Cursor, Cline, etc.
-
Analysis Capabilities:
- Topic trend analysis (popularity tracking, lifecycle, viral detection, trend prediction)
- Data insights (platform comparison, activity stats, keyword co-occurrence)
- Sentiment analysis, similar news finding, smart summary generation
- Historical related news search, multi-mode search
-
Update Note:
- This is an independent AI analysis feature, does not affect existing push functionality
- Optional use, no need to upgrade existing deployment
2025/10/15 - v2.4.4
-
Updates:
- Fixed ntfy push encoding issue + 1
- Fixed push time window judgment issue
-
Upgrade Note:
- Recommended minor version upgrade
2025/10/10 - v2.4.3
Thanks to nidaye996 for discovering the UX issue
-
Updates:
- Refactored "Silent Push Mode" naming to "Push Time Window Control", improving feature comprehension
- Clarified push time window as optional additional feature, can work with three push modes
- Improved comments and documentation, making feature positioning clearer
-
Upgrade Note:
- This is just refactoring, upgrade optional
2025/10/8 - v2.4.2
-
Updates:
- Fixed ntfy push encoding issue
- Fixed missing config file issue
- Optimized ntfy push effect
- Added GitHub Pages image segmented export feature
-
Upgrade Note:
- Recommend major version update
2025/10/2 - v2.4.0
Added ntfy Push Notification
-
Core Features:
- Supports ntfy.sh public service and self-hosted servers
-
Use Cases:
- Suitable for privacy-conscious users (supports self-hosting)
- Cross-platform push (iOS, Android, Desktop, Web)
- No account registration needed (public servers)
- Open-source and free (MIT License)
-
Upgrade Note:
- Recommend major version update
2025/09/26 - v2.3.2
- Fixed email notification config check being missed (#88)
Fix Description:
- Solved the issue where system still prompted "No webhook configured" even with correct email notification setup
2025/09/22 - v2.3.1
- Added email push feature, supports sending trending news reports to email
- Smart SMTP Recognition: Auto-detects Gmail, QQ Mail, Outlook, NetEase Mail and 10+ email service providers
- Beautiful HTML Format: Email content uses same HTML format as web version, well-formatted, mobile-adapted
- Batch Sending Support: Supports multiple recipients, separated by commas
- Custom SMTP: Can customize SMTP server and port
- Fixed Docker build network connection issue
Usage Notes:
- Use cases: Suitable for users needing email archiving, team sharing, scheduled reports
- Supported emails: Gmail, QQ Mail, Outlook/Hotmail, 163/126 Mail, Sina Mail, Sohu Mail, etc.
Upgrade Note:
- This update has many changes, if upgrading, recommend major version upgrade
2025/09/17 - v2.2.0
- Added one-click save news as image feature, easily share trending topics you care about
Usage Notes:
- Use case: After enabling web version feature (GitHub Pages)
- How to use: Open webpage on phone or PC, click "Save as Image" button at top
- Actual effect: System auto-creates beautiful image of current news report, saves to phone album or desktop
- Sharing convenience: Directly send this image to friends, Moments, or work groups, letting others see your discovered important info
2025/09/13 - v2.1.2
- Solved DingTalk push capacity limit causing news push failure (using batch push)
2025/09/04 - v2.1.1
- Fixed Docker unable to run properly on certain architectures
- Officially released official Docker image wantcat/trendradar, supports multi-architecture
- Optimized Docker deployment process, can use quickly without local build
2025/08/30 - v2.1.0
Core Improvements:
- Push Logic Optimization: Changed from "push every execution" to "controllable push within time window"
- Time Window Control: Can set push time range, avoid non-work hour disturbance
- Push Frequency Options: Supports single push or multiple pushes within time window
Upgrade Note:
- This feature is disabled by default, need to manually enable push time window control in config.yaml
- Upgrade requires updating both main.py and config.yaml files
2025/08/27 - v2.0.4
- This version is not a bug fix, but an important reminder
- Please keep webhooks properly, do not make public, do not make public, do not make public
- If you deployed this project on GitHub via fork, please put webhooks in GitHub Secret, not config.yaml
- If you already exposed webhooks or put them in config.yaml, suggest deleting and regenerating
2025/08/06 - v2.0.3
- Optimized GitHub Pages web version effect, convenient for mobile use
2025/07/28 - v2.0.2
- Refactored code
- Solved version number easily being missed for modification
2025/07/27 - v2.0.1
Fixed Issues:
- Docker shell script line ending as CRLF causing execution exception issue
- frequency_words.txt being empty causing news sending also empty logic issue
- After fix, when you choose frequency_words.txt empty, will push all news, but limited by message push size, please adjust as follows
- Option 1: Turn off mobile push, only choose GitHub Pages deployment (this is the way to get most complete info, will re-sort all platform trending by your custom trending algorithm)
- Option 2: Reduce push platforms, prioritize WeWork or Telegram, these two pushes I made batch push feature (because batch push affects push experience, and only these two platforms give very little push capacity, so had to make batch push feature, but at least can ensure complete info)
- Option 3: Can combine with Option 2, mode choose current or incremental can effectively reduce one-time push content
2025/07/17 - v2.0.0
Major Refactoring:
- Config management refactoring: All configs now managed through
config/config.yamlfile (main.py I still didn't split, convenient for you to copy and upgrade) - Run mode upgrade: Supports three modes -
daily(daily summary),current(current rankings),incremental(incremental monitoring) - Docker support: Complete Docker deployment solution, supports containerized operation
Config File Description:
config/config.yaml- Main config file (application settings, crawler config, notification config, platform config, etc.)config/frequency_words.txt- Keyword config (monitoring vocabulary settings)
2025/07/09 - v1.4.1
New Feature: Added incremental push (configure FOCUS_NEW_ONLY at top of main.py), this switch only cares about new topics not sustained heat, only sends notification when new content appears.
Fixed Issue: Under certain circumstances, some news containing special symbols caused occasional formatting exceptions.
2025/06/23 - v1.3.0
WeWork and Telegram push messages have length limits, I adopted splitting messages for pushing. Development docs see WeWork and Telegram
2025/06/21 - v1.2.1
Before this version, not only main.py needs copy replacement, crawler.yml also needs you to copy replacement https://github.com/sansan0/TrendRadar/blob/master/.github/workflows/crawler.yml
2025/06/19 - v1.2.0
Thanks to Claude Research for organizing various platform APIs, helping me quickly complete platform adaptation (although code is more redundant~
- Supports Telegram, WeWork, DingTalk push channels, supports multi-channel config and simultaneous push
2025/06/18 - v1.1.0
200 stars⭐ reached, continue celebrating with everyone~
- Important update, added weight, news you see now is hottest most concerned appearing at top
- Updated documentation usage, because recently updated many features, and previous usage docs I was lazy wrote simple (see ⚙️ frequency_words.txt complete configuration tutorial below)
2025/06/16 - v1.0.0
- Added project new version update reminder, default on, if want to turn off, can change "FEISHU_SHOW_VERSION_UPDATE": True to False in main.py
2025/06/13+14
- Removed compatibility code, students who forked before, directly copying code will show exception on same day (will recover normal next day)
- Feishu and html bottom added new news display
2025/06/09
100 stars⭐ reached, writing small feature to celebrate
frequency_words.txt file added required word feature, using + sign
- Required word syntax as follows: Tang Monk or Pig must both appear in title, will be included in push news
+Tang Monk
+Pig
- Filter word priority higher: If title filter word matches Tang Monk reciting sutras, then even if required word has Tang Monk, also not display
+Tang Monk
!Tang Monk reciting sutras
2025/06/02
- Webpage and Feishu messages support phone directly jumping to detailed news
- Optimized display effect + 1
2025/05/26
- Feishu message display effect optimized
🚀 Quick Start
📖 Reminder: Fork users should first check the latest official documentation to ensure the configuration steps are up to date.
⚠️ GitHub Actions Usage Instructions
v4.0.0 Important Change: Introduced "Activity Detection" mechanism—GitHub Actions now requires periodic check-in to maintain operation.
🔄 Check-In Renewal Mechanism
- Running Cycle: Valid for 7 days—service will automatically suspend when countdown ends.
- Renewal Method: Manually trigger the "Check In" workflow on the Actions page to reset the 7-day validity period.
- Operation Path:
Actions→Check In→Run workflow - Design Philosophy:
- If you forget for 7 days, maybe you don't really need it. Letting it stop is a digital detox, freeing you from the constant impact.
- GitHub Actions is a valuable public computing resource. The check-in mechanism aims to prevent wasted computing cycles, ensuring resources are allocated to truly active users who need them. Thank you for your understanding and support.
📦 Data Storage (Required Configuration)
In GitHub Actions environment, data is stored in Remote Cloud Storage (supports S3-compatible protocols, Cloudflare R2 recommended for free tier), keeping your repository clean (see Required Configuration: Remote Cloud Storage below).
🚀 Recommended: Docker Deployment
For long-term stable operation, we recommend Docker Deployment, with data stored locally and no check-in required—though it does require purchasing a cloud server.
🎉 Now Supported: Multi-Cloud Storage Options
This project now supports S3-compatible protocols. You can choose:
- Cloudflare R2 (Recommended, generous free tier)
- Other S3-compatible storage services
Simply configure the corresponding
S3_ENDPOINT_URL,S3_BUCKET_NAMEand other environment variables to switch.
-
Fork this project to your GitHub account
- Click the "Fork" button at the top right of this page
-
Setup GitHub Secrets (Required + Optional Platforms):
In your forked repo, go to
Settings>Secrets and variables>Actions>New repository secret📌 Important Instructions (Please Read Carefully):
- ✅ One Name for One Secret: For each configuration item, click the "New repository secret" button once and fill in a pair of "Name" and "Secret"
- ✅ Cannot See Value After Saving is Normal: For security reasons, after saving, you can only see the Name when re-editing, but not the Secret value
- ⚠️ DO NOT Create Custom Names: The Secret Name must strictly use the names listed below (e.g.,
WEWORK_WEBHOOK_URL,FEISHU_WEBHOOK_URL, etc.). Do not modify or create new names arbitrarily, or the system will not recognize them - 💡 Can Configure Multiple Platforms: The system will send notifications to all configured platforms
📌 Multi-Account Push Notes (v3.5.0 New Feature):
- ✅ Multi-Account Configuration Support: All push channels (Feishu, DingTalk, WeWork, Telegram, ntfy, Bark, Slack) support configuring multiple accounts
- ✅ Configuration Method: Use English semicolon
;to separate multiple account values - ✅ Example: Set
FEISHU_WEBHOOK_URLSecret value tohttps://webhook1;https://webhook2 - ⚠️ Paired Configuration: Telegram and ntfy require paired parameter quantities to match (e.g., token and chat_id both have 2 values)
- ⚠️ Quantity Limit: Default maximum 3 accounts per channel, exceeded values will be truncated
Multi-Account Configuration Examples:
Name Secret (Value) Example FEISHU_WEBHOOK_URLhttps://webhook1;https://webhook2;https://webhook3TELEGRAM_BOT_TOKENtoken1;token2TELEGRAM_CHAT_IDchatid1;chatid2NTFY_TOPICtopic1;topic2NTFY_TOKEN;token2(1st has no token, use empty string as placeholder)Configuration Example:
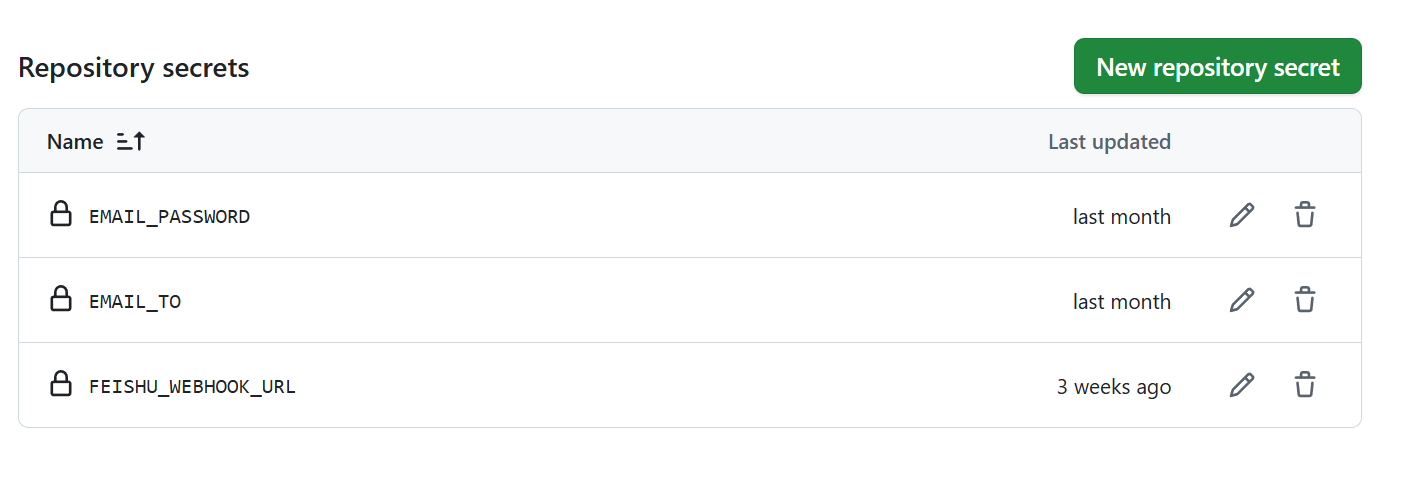
As shown above, each row is a configuration item:
- Name: Must use the fixed names listed in the expanded sections below (e.g.,
WEWORK_WEBHOOK_URL) - Secret (Value): Fill in the actual content obtained from the corresponding platform (e.g., Webhook URL, Token, etc.)
⚠️ Required Configuration: Remote Cloud Storage (Required for GitHub Actions Environment, Cloudflare R2 Recommended)
GitHub Secret Configuration (⚠️ All 4 configuration items below are required):
Name Secret (Value) Description S3_BUCKET_NAMEBucket name (e.g., trendradar-data)S3_ACCESS_KEY_IDAccess key ID S3_SECRET_ACCESS_KEYAccess key S3_ENDPOINT_URLS3 API endpoint (e.g., R2: https://<account-id>.r2.cloudflarestorage.com)
How to Get Credentials (Using Cloudflare R2 as Example):
- Visit Cloudflare Dashboard and log in
- Select
R2in left menu → ClickCreate Bucket→ Enter name (e.g.,trendradar-data) - Click
Manage R2 API Tokensat top right →Create API Token - Select
Object Read & Writepermission → After creation, it will displayAccess Key IDandSecret Access Key - Endpoint URL can be found in bucket details page (format:
https://<account-id>.r2.cloudflarestorage.com)
Notes:
- R2 free tier: 10GB storage + 1 million reads per month, sufficient for this project
- Activation requires binding a payment method (identity verification only, no charges)
- Data stored in cloud, keeps GitHub repository clean
👉 Click to expand: WeWork Bot (Simplest and fastest configuration)
GitHub Secret Configuration (⚠️ Name must match exactly):
- Name:
WEWORK_WEBHOOK_URL(Please copy and paste this name, do not type manually to avoid typos) - Secret (Value): Your WeWork bot Webhook address
Bot Setup Steps:
Mobile Setup:
- Open WeWork App → Enter target internal group chat
- Click "…" button at top right → Select "Message Push"
- Click "Add" → Name input "TrendRadar"
- Copy Webhook address, click save, paste the copied content into GitHub Secret above
PC Setup Process Similar
👉 Click to expand: Personal WeChat Push (Based on WeWork app, push to personal WeChat)
This solution is based on WeWork's plugin mechanism. The push style is plain text (no markdown format), but it can push directly to personal WeChat without installing WeWork App.
GitHub Secret Configuration (⚠️ Name must match exactly):
-
Name:
WEWORK_WEBHOOK_URL(Please copy and paste this name, do not type manually) -
Secret (Value): Your WeWork app Webhook address
-
Name:
WEWORK_MSG_TYPE(Please copy and paste this name, do not type manually) -
Secret (Value):
text
Setup Steps:
- Complete the WeWork bot Webhook setup above
- Add
WEWORK_MSG_TYPESecret with valuetext - Follow the image below to link personal WeChat
- After configuration, WeWork App can be deleted from phone

Notes:
- Uses the same Webhook address as WeWork bot
- Difference is message format:
textfor plain text,markdownfor rich text (default) - Plain text format will automatically remove all markdown syntax (bold, links, etc.)
👉 Click to expand: Feishu Bot (Most user-friendly message display)
GitHub Secret Configuration (⚠️ Name must match exactly):
- Name:
FEISHU_WEBHOOK_URL(Please copy and paste this name, do not type manually) - Secret (Value): Your Feishu bot Webhook address (link starts with https://www.feishu.cn/flow/api/trigger-webhook/********)
Two methods available, Method 1 is simpler, Method 2 is more complex (but stable push)
Method 1 discovered and suggested by ziventian, thanks to them. Default is personal push, group push can be configured via #97
Method 1:
For some users, additional operations needed to avoid "System Error". Need to search for the bot on mobile and enable Feishu bot application (suggestion from community, can refer)
-
Open in PC browser https://botbuilder.feishu.cn/home/my-command
-
Click "New Bot Command"
-
Click "Select Trigger", scroll down, click "Webhook Trigger"
-
Now you'll see "Webhook Address", copy this link to local notepad temporarily, continue with next steps
-
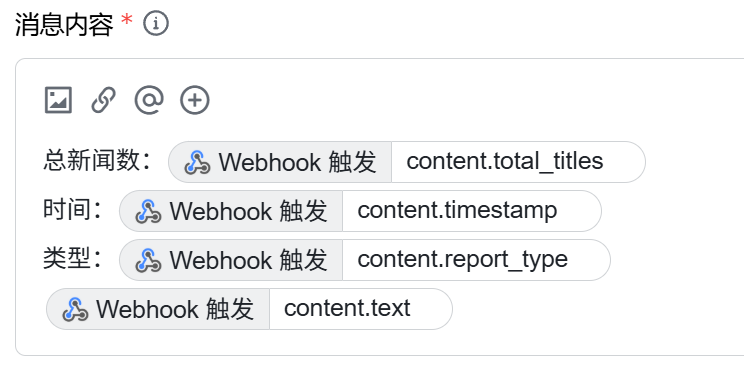
In "Parameters" put the following content, then click "Done"
{ "message_type": "text", "content": { "total_titles": "{{Content}}", "timestamp": "{{Content}}", "report_type": "{{Content}}", "text": "{{Content}}" } }-
Click "Select Action" > "Send via Official Bot"
-
Message title fill "TrendRadar Trending Monitor"
-
Most critical part, click + button, select "Webhook Trigger", then arrange as shown in image
- After configuration, put Webhook address from step 4 into GitHub Secrets
FEISHU_WEBHOOK_URL
Method 2:
-
Open in PC browser https://botbuilder.feishu.cn/home/my-app
-
Click "New Bot Application"
-
After entering the created application, click "Process Design" > "Create Process" > "Select Trigger"
-
Scroll down, click "Webhook Trigger"
-
Now you'll see "Webhook Address", copy this link to local notepad temporarily, continue with next steps
-
In "Parameters" put the following content, then click "Done"
{ "message_type": "text", "content": { "total_titles": "{{Content}}", "timestamp": "{{Content}}", "report_type": "{{Content}}", "text": "{{Content}}" } }-
Click "Select Action" > "Send Feishu Message", check "Group Message", then click the input box below, click "Groups I Manage" (if no group, you can create one in Feishu app)
-
Message title fill "TrendRadar Trending Monitor"
-
Most critical part, click + button, select "Webhook Trigger", then arrange as shown in image
- After configuration, put Webhook address from step 5 into GitHub Secrets
FEISHU_WEBHOOK_URL
👉 Click to expand: DingTalk Bot
GitHub Secret Configuration (⚠️ Name must match exactly):
- Name:
DINGTALK_WEBHOOK_URL(Please copy and paste this name, do not type manually) - Secret (Value): Your DingTalk bot Webhook address
Bot Setup Steps:
-
Create Bot (PC Only):
- Open DingTalk PC client, enter target group chat
- Click group settings icon (⚙️) → Scroll down to find "Bot" and click
- Select "Add Bot" → "Custom"
-
Configure Bot:
- Set bot name
- Security Settings:
- Custom Keywords: Set "Trending" or "热点"
-
Complete Setup:
- Check service terms agreement → Click "Done"
- Copy the obtained Webhook URL
- Put URL into GitHub Secrets
DINGTALK_WEBHOOK_URL
Note: Mobile can only receive messages, cannot create new bots.
👉 Click to expand: Telegram Bot
GitHub Secret Configuration (⚠️ Name must match exactly):
-
Name:
TELEGRAM_BOT_TOKEN(Please copy and paste this name, do not type manually) -
Secret (Value): Your Telegram Bot Token
-
Name:
TELEGRAM_CHAT_ID(Please copy and paste this name, do not type manually) -
Secret (Value): Your Telegram Chat ID
Note: Telegram requires two Secrets, please click "New repository secret" button twice to add them separately
Bot Setup Steps:
-
Create Bot:
- Search
@BotFatherin Telegram (note case, has blue verification checkmark, shows ~37849827 monthly users, this is official, beware of fake accounts) - Send
/newbotcommand to create new bot - Set bot name (must end with "bot", easily runs into duplicate names, so think creatively)
- Get Bot Token (format like:
123456789:AAHfiqksKZ8WmR2zSjiQ7_v4TMAKdiHm9T0)
- Search
-
Get Chat ID:
Method 1: Via Official API
- First send a message to your bot
- Visit:
https://api.telegram.org/bot<Your Bot Token>/getUpdates - Find the number in
"chat":{"id":number}in returned JSON
Method 2: Using Third-Party Tool
- Search
@userinfobotand send/start - Get your user ID as Chat ID
-
Configure to GitHub:
TELEGRAM_BOT_TOKEN: Fill in Bot Token from step 1TELEGRAM_CHAT_ID: Fill in Chat ID from step 2
👉 Click to expand: Email Push (Supports all mainstream email providers)
- Note: To prevent email bulk sending abuse, current bulk sending allows all recipients to see each other's email addresses.
- If you haven't configured email sending before, not recommended to try
GitHub Secret Configuration (⚠️ Name must match exactly):
-
Name:
EMAIL_FROM(Please copy and paste this name, do not type manually) -
Secret (Value): Sender email address
-
Name:
EMAIL_PASSWORD(Please copy and paste this name, do not type manually) -
Secret (Value): Email password or authorization code
-
Name:
EMAIL_TO(Please copy and paste this name, do not type manually) -
Secret (Value): Recipient email address (multiple separated by comma, or can be same as EMAIL_FROM to send to yourself)
-
Name:
EMAIL_SMTP_SERVER(Optional, please copy and paste this name) -
Secret (Value): SMTP server address (leave empty for auto-detection)
-
Name:
EMAIL_SMTP_PORT(Optional, please copy and paste this name) -
Secret (Value): SMTP port (leave empty for auto-detection)
Note: Email push requires at least 3 required Secrets (EMAIL_FROM, EMAIL_PASSWORD, EMAIL_TO), the last two are optional
Supported Email Providers (Auto-detect SMTP config):
Provider Domain SMTP Server Port Encryption Gmail gmail.com smtp.gmail.com 587 TLS QQ Mail qq.com smtp.qq.com 465 SSL Outlook outlook.com smtp-mail.outlook.com 587 TLS Hotmail hotmail.com smtp-mail.outlook.com 587 TLS Live live.com smtp-mail.outlook.com 587 TLS 163 Mail 163.com smtp.163.com 465 SSL 126 Mail 126.com smtp.126.com 465 SSL Sina Mail sina.com smtp.sina.com 465 SSL Sohu Mail sohu.com smtp.sohu.com 465 SSL 189 Mail 189.cn smtp.189.cn 465 SSL Aliyun Mail aliyun.com smtp.aliyun.com 465 TLS Auto-detect: When using above emails, no need to manually configure
EMAIL_SMTP_SERVERandEMAIL_SMTP_PORT, system auto-detects.Feedback Notice:
- If you successfully test with other email providers, please open an Issue to let us know, we'll add to support list
- If above email configurations are incorrect or unusable, please also open an Issue for feedback to help improve the project
Special Thanks:
- Thanks to @DYZYD for contributing 189 Mail (189.cn) configuration and completing self-send-receive testing (#291)
- Thanks to @longzhenren for contributing Aliyun Mail (aliyun.com) configuration and completing testing (#344)
Common Email Settings:
QQ Mail:
- Login QQ Mail web version → Settings → Account
- Enable POP3/SMTP service
- Generate authorization code (16-letter code)
EMAIL_PASSWORDfill authorization code, not QQ password
Gmail:
- Enable two-step verification
- Generate app-specific password
EMAIL_PASSWORDfill app-specific password
163/126 Mail:
- Login web version → Settings → POP3/SMTP/IMAP
- Enable SMTP service
- Set client authorization code
EMAIL_PASSWORDfill authorization code
Advanced Configuration: If auto-detect fails, manually configure SMTP:
EMAIL_SMTP_SERVER: Like smtp.gmail.comEMAIL_SMTP_PORT: Like 587 (TLS) or 465 (SSL)
Multiple Recipients (note: English comma separator):
- EMAIL_TO="user1@example.com,user2@example.com,user3@example.com"
👉 Click to expand: ntfy Push (Open-source, free, self-hostable)
Two Usage Methods:
Method 1: Free Use (Recommended for Beginners) 🆓
Features:
- ✅ No account registration, use immediately
- ✅ 250 messages/day (enough for 90% users)
- ✅ Topic name is "password" (need to choose hard-to-guess name)
- ⚠️ Messages unencrypted, not for sensitive info, but suitable for our non-sensitive project info
Quick Start:
-
Download ntfy App:
- Android: Google Play / F-Droid
- iOS: App Store
- Desktop: Visit ntfy.sh
-
Subscribe to Topic (choose a hard-to-guess name):
Suggested format: trendradar-{your initials}-{random numbers} Cannot use Chinese ✅ Good example: trendradar-zs-8492 ❌ Bad example: news, alerts (too easy to guess) -
Configure GitHub Secret (⚠️ Name must match exactly):
-
Name:
NTFY_TOPIC(Please copy and paste this name, do not type manually) -
Secret (Value): Fill in your subscribed topic name
-
Name:
NTFY_SERVER_URL(Optional, please copy and paste this name) -
Secret (Value): Leave empty (default uses ntfy.sh)
-
Name:
NTFY_TOKEN(Optional, please copy and paste this name) -
Secret (Value): Leave empty
Note: ntfy requires at least 1 required Secret (NTFY_TOPIC), the last two are optional
-
-
Test:
curl -d "Test message" ntfy.sh/your-topic-name
Method 2: Self-Hosting (Complete Privacy Control) 🔒
Target Users: Have server, pursue complete privacy, strong technical ability
Advantages:
- ✅ Completely open-source (Apache 2.0 + GPLv2)
- ✅ Complete data self-control
- ✅ No restrictions
- ✅ Zero cost
Docker One-Click Deploy:
docker run -d \
  --name ntfy \
  -p 80:80 \
  -v /var/cache/ntfy:/var/cache/ntfy \
  binwiederhier/ntfy \
  serve --cache-file /var/cache/ntfy/cache.db
Configure TrendRadar:
NTFY_SERVER_URL: https://ntfy.yourdomain.com
NTFY_TOPIC: trendradar-alerts  # Self-hosting can use simple name
NTFY_TOKEN: tk_your_token  # Optional: Enable access control
Subscribe in App:
- Click "Use another server"
- Enter your server address
- Enter topic name
- (Optional) Enter login credentials
FAQ:
Q1: Is the free version enough?
250 messages/day is enough for most users. With 30-minute crawl intervals, about 48 pushes/day, completely sufficient.
Q2: Is the Topic name really secure?
If you choose a random, sufficiently long name (like
trendradar-zs-8492-news), brute force is nearly impossible:- ntfy has strict rate limiting (1 request/second)
- 64 character choices (A-Z, a-z, 0-9, _, -)
- 10 random characters have 64^10 possibilities (would take years to crack)
Recommended Choice:
User Type Recommended Reason Regular Users Method 1 (Free) Simple, fast, enough Technical Users Method 2 (Self-Host) Complete control, unlimited High-Frequency Users Method 3 (Paid) Check official website Related Links:
👉 Click to expand: Bark Push (iOS exclusive, clean & efficient)
GitHub Secret Configuration (⚠️ Name must be exact):
- Name:
BARK_URL(copy and paste this name, don't type manually) - Secret: Your Bark push URL
Bark Introduction:
Bark is a free open-source push tool for iOS platform, featuring simplicity, speed, and no ads.
Usage Methods:
Method 1: Use Official Server (Recommended for beginners) 🆓
-
Download Bark App:
- iOS: App Store
-
Get Push URL:
- Open Bark App
- Copy the push URL displayed on the home page (format:
https://api.day.app/your_device_key) - Configure the URL to GitHub Secrets as
BARK_URL
Method 2: Self-Hosted Server (Complete Privacy Control) 🔒
Suitable for: Users with servers, pursuing complete privacy, strong technical skills
Docker One-Click Deployment:
docker run -d \
  --name bark-server \
  -p 8080:8080 \
  finab/bark-server
Configure TrendRadar:
BARK_URL: http://your-server-ip:8080/your_device_key
Notes:
- ✅ Bark uses APNs push, max 4KB per message
- ✅ Supports automatic batch sending, no worry about long messages
- ✅ Push format is plain text (automatically removes Markdown syntax)
- ⚠️ Only supports iOS platform
Related Links:
👉 Click to expand: Slack Push
GitHub Secret Configuration (⚠️ Name must be exact):
- Name:
SLACK_WEBHOOK_URL(copy and paste this name, don't type manually) - Secret: Your Slack Incoming Webhook URL
Slack Introduction:
Slack is a team collaboration tool, Incoming Webhooks can push messages to Slack channels.
Setup Steps:
Step 1: Create Slack App
-
Visit Slack API Page:
- Open https://api.slack.com/apps?new_app=1
- Login to your Slack workspace if not logged in
-
Choose Creation Method:
- Click "From scratch"
-
Fill in App Information:
- App Name: Enter app name (e.g.,
TrendRadarorHot News Monitor) - Workspace: Select your workspace from dropdown
- Click "Create App" button
- App Name: Enter app name (e.g.,
Step 2: Enable Incoming Webhooks
-
Navigate to Incoming Webhooks:
- Find and click "Incoming Webhooks" in left menu
-
Enable Feature:
- Find "Activate Incoming Webhooks" toggle
- Switch from
OFFtoON - Page will auto-refresh showing new configuration options
Step 3: Generate Webhook URL
-
Add New Webhook:
- Scroll to page bottom
- Click "Add New Webhook to Workspace" button
-
Select Target Channel:
- System will show authorization page
- Select channel to receive messages from dropdown (e.g.,
#hot-news) - ⚠️ For private channels, must join the channel first
-
Authorize App:
- Click "Allow" button to complete authorization
- System will auto-redirect back to config page
Step 4: Copy and Save Webhook URL
-
View Generated URL:
- In "Webhook URLs for Your Workspace" section
- You'll see the newly generated Webhook URL
- Format:
https://hooks.slack.com/services/T00000000/B00000000/XXXXXXXXXXXXXXXXXXXXXXXX
-
Copy URL:
- Click "Copy" button on the right of URL
- Or manually select and copy URL
-
Configure to TrendRadar:
- GitHub Actions: Add URL to GitHub Secrets as
SLACK_WEBHOOK_URL - Local Testing: Fill URL in
config/config.yamlslack_webhook_urlfield - Docker Deployment: Add URL to
docker/.envfile asSLACK_WEBHOOK_URLvariable
- GitHub Actions: Add URL to GitHub Secrets as
Notes:
- ✅ Supports Markdown format (auto-converts to Slack mrkdwn)
- ✅ Supports automatic batch sending (4KB per batch)
- ✅ Suitable for team collaboration, centralized message management
- ⚠️ Webhook URL contains secret key, never make it public
Message Format Preview:
*[Batch 1/2]*

📊 *Trending Topics Statistics*

🔥 *[1/3] AI ChatGPT* : 2 articles

  1. [Baidu Hot] 🆕 ChatGPT-5 Official Release *[1]* - 09:15 (1 time)

  2. [Toutiao] AI Chip Stocks Surge *[3]* - [08:30 ~ 10:45] (3 times)
Related Links:
💡 Beginner Quick Start Tip:
For first deployment, suggest completing GitHub Secrets configuration first (choose one push platform), then jump to [Step 3] to test push success.
Don't modify
config/config.yamlandfrequency_words.txttemporarily, adjust these configs after push test succeeds as needed. -
Manual Test News Push:
💡 Complete Step 1-2 first, then test immediately! Test success first, then adjust configuration (Step 4) as needed.
⚠️ IMPORTANT: Enter your own forked project, not this project!
How to find your Actions page:
- Method 1: Open your forked project homepage, click the Actions tab at the top
- Method 2: Direct access
https://github.com/YourUsername/TrendRadar/actions
Example comparison:
- ❌ Author's project:
https://github.com/sansan0/TrendRadar/actions - ✅ Your project:
https://github.com/YourUsername/TrendRadar/actions
Testing steps:
- Enter your project's Actions page
- Find "Hot News Crawler" and click in
- If you don't see this text, refer to #109 to solve
- Click "Run workflow" button on the right to run
- Wait about 1 minute, messages will be pushed to your configured platform
⏱️ Testing Tips:
- Don't test too frequently to avoid triggering GitHub Actions limits
- After clicking Run workflow, you need to refresh the browser page to see the new run record
-
Configuration Notes (Optional):
💡 Default configuration works normally, only adjust if you need personalization, understand these three files:
File Purpose config/config.yamlMain config file: push mode, time window, platform list, hotspot weights, etc. config/frequency_words.txtKeyword file: set your interested keywords, filter push content .github/workflows/crawler.ymlExecution frequency: control how often to run (⚠️ modify carefully) 👉 Detailed Configuration Tutorial: Configuration Guide
-
🎉 Deployment Success! Share Your Experience
Congratulations on completing TrendRadar configuration! You can now start tracking trending news.
💬 Join our community to share your experience~
- Want to learn more tips and advanced techniques?
- Need quick help with issues?
- Have great ideas to share?
👉 Follow our WeChat Official Account「硅基茶水间」(Silicon Tea Room), your likes and comments are the driving force for continuous updates!
For detailed communication methods, please check → FAQ & Support
-
🤖 Want Smarter Analysis? Try AI-Enhanced Features (Optional)
Basic configuration already meets daily needs, but if you want:
- 📊 Let AI automatically analyze trending topics and data insights
- 🔍 Search and query news using natural language
- 💡 Get sentiment analysis, topic prediction, and deep analytics
- ⚡ Directly access data in AI tools like Claude, Cursor, etc.
👉 Learn More: AI Analysis — Unlock hidden capabilities and make trend tracking more efficient!
⚙️ Configuration Guide
📖 Reminder: This chapter provides detailed configuration explanations. Suggest completing Quick Start basic configuration first, then refer to detailed options here as needed.
1. Platform Configuration
👉 Click to expand: Custom Monitoring Platforms
Configuration Location: platforms section in config/config.yaml
This project's news data comes from newsnow. You can click the website, click [More], to see if there are platforms you want.
For specific additions, visit project source code, based on the file names there, modify the platforms configuration in config/config.yaml file:
platforms:
  - id: "toutiao"
    name: "Toutiao"
  - id: "baidu"
    name: "Baidu Hot Search"
  - id: "wallstreetcn-hot"
    name: "Wallstreetcn"
  # Add more platforms...
💡 Shortcut: If you don't know how to read source code, you can copy from others' organized Platform Configuration Summary
⚠️ Note: More platforms is not always better, suggest choosing 10-15 core platforms. Too many platforms will cause information overload and actually reduce user experience.
2. Keyword Configuration
Configuration Location: config/frequency_words.txt
Configure monitoring keywords in frequency_words.txt with five syntax types, region markers, and grouping features.
| Syntax Type | Symbol | Purpose | Example | Matching Logic |
|---|---|---|---|---|
| Normal | None | Basic matching | Huawei |
Match any one |
| Required | + |
Scope limiting | +phone |
Must include both |
| Filter | ! |
Noise exclusion | !ad |
Exclude if included |
| Count Limit | @ |
Control display count | @10 |
Max 10 news (v3.2.0 new) |
| Global Filter | [GLOBAL_FILTER] |
Globally exclude content | See example below | Filter under any circumstances (v3.5.0 new) |
2.1 Basic Syntax
👉 Click to expand: Basic Syntax Tutorial
1. Normal Keywords - Basic Matching
Huawei
OPPO
Apple
Effect: News containing any one of these words will be captured
2. Required Words +word - Scope Limiting
Huawei
OPPO
+phone
Effect: Must include both normal word and required word to be captured
3. Filter Words !word - Noise Exclusion
Apple
Huawei
!fruit
!price
Effect: News containing filter words will be excluded, even if it contains keywords
4. Count Limit @number - Control Display Count (v3.2.0 new)
Tesla
Musk
@5
Effect: Limit maximum news count for this keyword group
Priority: @number > Global config > Unlimited
5. Global Filter [GLOBAL_FILTER] - Globally Exclude Content (v3.5.0 new)
[GLOBAL_FILTER]
advertisement
promotion
marketing
shocking
clickbait

[WORD_GROUPS]
technology
AI

Huawei
HarmonyOS
!car
Effect: Filters news containing specified words under any circumstances, with highest priority
Use Cases:
- Filter low-quality content: shocking, clickbait, breaking news, etc.
- Filter marketing content: advertisement, promotion, sponsorship, etc.
- Filter specific topics: entertainment, gossip (based on needs)
Filter Priority: Global Filter > Group Filter(!) > Group Matching
Region Markers:
[GLOBAL_FILTER]: Global filter region, words are filtered under any circumstances[WORD_GROUPS]: Keyword groups region, maintains existing syntax (!,+,@)- If no region markers are used, all content is treated as keyword groups (backward compatible)
Matching Examples:
[GLOBAL_FILTER]
advertisement

[WORD_GROUPS]
technology
AI
- ❌ "Advertisement: Latest tech product launch" ← Contains global filter word "advertisement", rejected
- ✅ "Tech company launches new AI product" ← No global filter words, matches "technology" group
- ✅ "AI technology breakthrough draws attention" ← No global filter words, matches "AI" in "technology" group
Important Notes:
- Use global filter words carefully to avoid over-filtering and missing valuable content
- Recommended to keep global filter words under 5-15
- For group-specific filtering, prioritize using group filter words (
!prefix)
🔗 Group Feature - Importance of Empty Lines
Core Rule: Use empty lines to separate different groups, each group is independently counted
Example Configuration:
iPhone
Huawei
OPPO
+launch

A-shares
Shanghai Index
Shenzhen Index
+fluctuation
!prediction

World Cup
Euro Cup
Asian Cup
+match
Group Explanation and Matching Effects:
Group 1 - Phone Launches:
- Keywords: iPhone, Huawei, OPPO
- Required: launch
- Effect: Must include phone brand name and "launch"
Matching Examples:
- ✅ "iPhone 15 officially launched with pricing" ← Has "iPhone" + "launch"
- ✅ "Huawei Mate60 series launch livestream" ← Has "Huawei" + "launch"
- ✅ "OPPO Find X7 launch date confirmed" ← Has "OPPO" + "launch"
- ❌ "iPhone sales hit record high" ← Has "iPhone" but missing "launch"
Group 2 - Stock Market:
- Keywords: A-shares, Shanghai Index, Shenzhen Index
- Required: fluctuation
- Filter: prediction
- Effect: Include stock-related words and "fluctuation", but exclude "prediction"
Matching Examples:
- ✅ "A-shares major fluctuation analysis today" ← Has "A-shares" + "fluctuation"
- ✅ "Shanghai Index fluctuation reasons explained" ← Has "Shanghai Index" + "fluctuation"
- ❌ "Experts predict A-shares fluctuation trends" ← Has "A-shares" + "fluctuation" but contains "prediction"
- ❌ "A-shares trading volume hits new high" ← Has "A-shares" but missing "fluctuation"
Group 3 - Football Events:
- Keywords: World Cup, Euro Cup, Asian Cup
- Required: match
- Effect: Must include cup name and "match"
Matching Examples:
- ✅ "World Cup group stage match results" ← Has "World Cup" + "match"
- ✅ "Euro Cup final match time" ← Has "Euro Cup" + "match"
- ❌ "World Cup tickets on sale" ← Has "World Cup" but missing "match"
🎯 Configuration Tips
1. From Broad to Strict Strategy
# Step 1: Start with broad keywords for testing
Artificial Intelligence
AI
ChatGPT

# Step 2: After finding mismatches, add required words
Artificial Intelligence
AI
ChatGPT
+technology

# Step 3: After finding noise, add filter words
Artificial Intelligence
AI
ChatGPT
+technology
!advertisement
!training
2. Avoid Over-Complexity
❌ Not Recommended: Too many words in one group
Huawei
OPPO
Apple
Samsung
vivo
OnePlus
Meizu
+phone
+launch
+sales
!fake
!repair
!second-hand
Recommended: Split into precise groups
Huawei
OPPO
+new product

Apple
Samsung
+launch

phone
sales
+market
2.2 Advanced Settings (v3.2.0 new)
👉 Click to expand: Advanced Settings Tutorial
Keyword Sorting Priority
Config Location: config/config.yaml
report:
  sort_by_position_first: false  # Sorting priority config
| Value | Sorting Rule | Use Case |
|---|---|---|
false (default) |
News count ↓ → Config position ↑ | Focus on popularity trends |
true |
Config position ↑ → News count ↓ | Focus on personal priority |
Example: Config order A, B, C, news count A(3), B(10), C(5)
false: B(10) → C(5) → A(3)true: A(3) → B(10) → C(5)
Global Display Count Limit
report:
  max_news_per_keyword: 10  # Max 10 per keyword (0=unlimited)
Docker Environment Variables:
SORT_BY_POSITION_FIRST=true
MAX_NEWS_PER_KEYWORD=10
Combined Example:
# config.yaml
report:
  sort_by_position_first: true   # Config order priority
  max_news_per_keyword: 10       # Global default max 10 per keyword
# frequency_words.txt
Tesla
Musk
@20              # Key focus, show 20 (override global)

Huawei           # Use global config, show 10

BYD
@5               # Limit to 5
Final Effect: Display in config order: Tesla(20) → Huawei(10) → BYD(5)
3. Push Mode Details
👉 Click to expand: Three Push Modes Detailed Comparison
Configuration Location: report.mode in config/config.yaml
report:
  mode: "daily"  # Options: "daily" | "incremental" | "current"
Docker Environment Variable: REPORT_MODE=incremental
Detailed Comparison Table
| Mode | Target Users | Push Timing | Display Content | Typical Use Case |
|---|---|---|---|---|
Daily Summarydaily |
📋 Managers/Regular Users | Scheduled push (default hourly) | All matched news of the day + New news section |
Example: Check all important news of the day at 6 PM Feature: See full-day trend, don't miss any hot topic Note: Will include previously pushed news |
Current Rankingscurrent |
📰 Content Creators | Scheduled push (default hourly) | Current ranking matches + New news section |
Example: Track "which topics are hottest now" hourly Feature: Real-time understanding of current popularity ranking changes Note: Continuously ranked news appear each time |
Incremental Monitorincremental |
📈 Traders/Investors | Push only when new | Newly appeared frequency word matches | Example: Monitor "Tesla", only notify when new news appears Feature: Zero duplication, only see first-time news Suitable for: High-frequency monitoring, avoid information disturbance |
Actual Push Effect Example
Assume you monitor "Apple" keyword, execute once per hour:
| Time | daily Mode Push | current Mode Push | incremental Mode Push |
|---|---|---|---|
| 10:00 | News A, News B | News A, News B | News A, News B |
| 11:00 | News A, News B, News C | News B, News C, News D | Only News C |
| 12:00 | News A, News B, News C | News C, News D, News E | Only News D, News E |
Explanation:
daily: Cumulative display of all news of the day (A, B, C all retained)current: Display current ranking news (ranking changed, News D on list, News A off list)incremental: Only push newly appeared news (avoid duplicate disturbance)
Common Questions
💡 Encountered this problem? 👉 "Execute once per hour, news output in first execution still appears in next hour execution"
- Reason: You might have selected
daily(Daily Summary) orcurrent(Current Rankings) mode- Solution: Change to
incremental(Incremental Monitor) mode, only push new content
⚠️ Incremental Mode Important Notice
Users who selected
incremental(Incremental Monitor) mode, please note:📌 Incremental mode only pushes when there are new matching news
If you haven't received push notifications for a long time, it may be because:
- No new hot topics matching your keywords in current time period
- Keyword configuration is too strict or too broad
- Too few monitoring platforms
Solutions:
- Solution 1: 👉 Optimize Keyword Configuration - Adjust keyword precision, add or modify monitoring keywords
- Solution 2: Switch push mode - Change to
currentordailymode for scheduled push notifications- Solution 3: 👉 Add More Platforms - Add more news platforms to expand information sources
4. Advanced Configuration - Hotspot Weight Adjustment
👉 Click to expand: Hotspot Weight Adjustment
Configuration Location: weight section in config/config.yaml
weight:
  rank_weight: 0.6       # Ranking weight
  frequency_weight: 0.3  # Frequency weight
  hotness_weight: 0.1    # Hotness weight
Current default configuration is balanced.
Two Core Scenarios
Real-Time Trending Type:
weight:
  rank_weight: 0.8    # Mainly focus on ranking
  frequency_weight: 0.1  # Less concern about continuity
  hotness_weight: 0.1
Target Users: Content creators, marketers, users wanting to quickly understand current hot topics
In-Depth Topic Type:
weight:
  rank_weight: 0.4    # Moderate ranking focus
  frequency_weight: 0.5  # Emphasize sustained heat within the day
  hotness_weight: 0.1
Target Users: Investors, researchers, journalists, users needing deep trend analysis
Adjustment Method
- Three numbers must sum to 1.0
- Increase what's important: Increase rank_weight for rankings, frequency_weight for continuity
- Suggest adjusting 0.1-0.2 at a time, observe effects
Core idea: Users pursuing speed and timeliness increase ranking weight, users pursuing depth and stability increase frequency weight.
5. Push Format Reference
👉 Click to expand: Push Format Explanation
Push Example
📊 Trending Keywords Stats
🔥 [1/3] AI ChatGPT : 2 items
-
[Baidu Hot] 🆕 ChatGPT-5 officially launched [1] - 09:15 (1 time)
-
[Toutiao] AI chip concept stocks surge [3] - [08:30 ~ 10:45] (3 times)
━━━━━━━━━━━━━━━━━━━
📈 [2/3] BYD Tesla : 2 items
-
[Weibo] 🆕 BYD monthly sales break record [2] - 10:20 (1 time)
-
[Douyin] Tesla price reduction promotion [4] - [07:45 ~ 09:15] (2 times)
━━━━━━━━━━━━━━━━━━━
📌 [3/3] A-shares Stock Market : 1 item
- [Wallstreetcn] A-shares midday review [5] - [11:30 ~ 12:00] (2 times)
🆕 New Trending News (Total 2 items)
Baidu Hot (1 item):
- ChatGPT-5 officially launched [1]
Weibo (1 item):
- BYD monthly sales break record [2]
Updated: 2025-01-15 12:30:15
Message Format Explanation
| Format Element | Example | Meaning | Description |
|---|---|---|---|
| 🔥📈📌 | 🔥 [1/3] AI ChatGPT | Popularity Level | 🔥 High (≥10) 📈 Medium (5-9) 📌 Normal (<5) |
| [Number/Total] | [1/3] | Rank Position | Current group rank among all matches |
| Keyword Group | AI ChatGPT | Keyword Group | Group from config, title must contain words |
| : N items | : 2 items | Match Count | Total news matching this group |
| [Platform] | [Baidu Hot] | Source Platform | Platform name of the news |
| 🆕 | 🆕 ChatGPT-5 officially launched | New Mark | First appearance in this round |
| [number] | [1] | High Rank | Rank ≤ threshold, bold red display |
| [number] | [7] | Normal Rank | Rank > threshold, normal display |
| - time | - 09:15 | First Time | Time when news was first discovered |
| [time~time] | [08:30 ~ 10:45] | Duration | Time range from first to last appearance |
| (N times) | (3 times) | Frequency | Total appearances during monitoring |
| New Section | 🆕 New Trending News | New Topic Summary | Separately shows newly appeared topics |
6. Docker Deployment
👉 Click to expand: Complete Docker Deployment Guide
Image Description:
TrendRadar provides two independent Docker images, deploy according to your needs:
| Image Name | Purpose | Description |
|---|---|---|
wantcat/trendradar |
News Push Service | Scheduled news crawling, push notifications (Required) |
wantcat/trendradar-mcp |
AI Analysis Service | MCP protocol support, AI dialogue analysis (Optional) |
💡 Recommendations:
- Only need push functionality: Deploy
wantcat/trendradarimage only- Need AI analysis: Deploy both images
Method 1: Using docker compose (Recommended)
-
Create Project Directory and Config:
Method 1-A: Using git clone (Recommended, Simplest)
# Clone project to local
git clone https://github.com/sansan0/TrendRadar.git
cd TrendRadar
Method 1-B: Using wget to download config files
# Create directory structure
mkdir -p trendradar/{config,docker}
cd trendradar

# Download config file templates
wget https://raw.githubusercontent.com/sansan0/TrendRadar/master/config/config.yaml -P config/
wget https://raw.githubusercontent.com/sansan0/TrendRadar/master/config/frequency_words.txt -P config/

# Download docker compose config
wget https://raw.githubusercontent.com/sansan0/TrendRadar/master/docker/.env -P docker/
wget https://raw.githubusercontent.com/sansan0/TrendRadar/master/docker/docker-compose.yml -P docker/
💡 Note: Key directory structure required for Docker deployment:
current directory/
├── config/
│   ├── config.yaml
│   └── frequency_words.txt
└── docker/
    ├── .env
    └── docker-compose.yml
-
Config File Description:
config/config.yaml- Application main config (report mode, push settings, etc.)config/frequency_words.txt- Keyword config (set your interested trending keywords).env- Environment variable config (webhook URLs and scheduled tasks)
⚙️ Environment Variable Override Mechanism (v3.0.5+)
If you encounter config.yaml modifications not taking effect in NAS or other Docker environments, you can directly override configs via environment variables:
Environment Variable Corresponding Config Example Value Description ENABLE_CRAWLERcrawler.enable_crawlertrue/falseEnable crawler ENABLE_NOTIFICATIONnotification.enable_notificationtrue/falseEnable notification REPORT_MODEreport.modedaily/incremental/currentReport mode MAX_ACCOUNTS_PER_CHANNELnotification.max_accounts_per_channel3Maximum accounts per channel PUSH_WINDOW_ENABLEDnotification.push_window.enabledtrue/falsePush time window switch PUSH_WINDOW_STARTnotification.push_window.time_range.start08:00Push start time PUSH_WINDOW_ENDnotification.push_window.time_range.end22:00Push end time ENABLE_WEBSERVER- true/falseAuto-start web server WEBSERVER_PORT- 8080Web server port (default 8080) FEISHU_WEBHOOK_URLnotification.webhooks.feishu_urlhttps://...Feishu Webhook (supports multi-account, use ;separator)Config Priority: Environment Variables > config.yaml
Usage Method:
- Modify
.envfile, uncomment and fill in needed configs - Or add directly in NAS/Synology Docker management interface's "Environment Variables"
- Restart container to take effect:
docker compose up -d
-
Start Service:
Option A: Start All Services (Push + AI Analysis)
# Pull latest images
docker compose pull

# Start all services (trend-radar + trend-radar-mcp)
docker compose up -d
Option B: Start News Push Service Only
# Start trend-radar only (scheduled crawling and push)
docker compose pull trend-radar
docker compose up -d trend-radar
Option C: Start MCP AI Analysis Service Only
# Start trend-radar-mcp only (AI analysis interface)
docker compose pull trend-radar-mcp
docker compose up -d trend-radar-mcp
💡 Tips:
- Most users only need to start
trend-radarfor news push functionality - Only start
trend-radar-mcpwhen using Claude/ChatGPT for AI dialogue analysis - Both services are independent and can be flexibly combined
- Most users only need to start
-
Check Running Status:
# View news push service logs
docker logs -f trend-radar

# View MCP AI analysis service logs
docker logs -f trend-radar-mcp

# View all container status
docker ps | grep trend-radar

# Stop specific service
docker compose stop trend-radar      # Stop push service
docker compose stop trend-radar-mcp  # Stop MCP service
Method 2: Local Build (Developer Option)
If you need custom code modifications or build your own image:
# Clone project
git clone https://github.com/sansan0/TrendRadar.git
cd TrendRadar

# Modify config files
vim config/config.yaml
vim config/frequency_words.txt

# Use build version docker compose
cd docker
cp docker-compose-build.yml docker-compose.yml
Build and Start Services:
# Option A: Build and start all services
docker compose build
docker compose up -d

# Option B: Build and start news push service only
docker compose build trend-radar
docker compose up -d trend-radar

# Option C: Build and start MCP AI analysis service only
docker compose build trend-radar-mcp
docker compose up -d trend-radar-mcp
💡 Architecture Parameter Notes:
- Default builds
amd64architecture images (suitable for most x86_64 servers)- To build
arm64architecture (Apple Silicon, Raspberry Pi, etc.), set environment variable:export DOCKER_ARCH=arm64 docker compose build
Image Update
# Method 1: Manual update (Crawler + MCP images)
docker pull wantcat/trendradar:latest
docker pull wantcat/trendradar-mcp:latest
docker compose down
docker compose up -d

# Method 2: Using docker compose update
docker compose pull
docker compose up -d
Available Images:
| Image Name | Purpose | Description |
|---|---|---|
wantcat/trendradar |
News Push Service | Scheduled news crawling, push notifications |
wantcat/trendradar-mcp |
MCP Service | AI analysis features (optional) |
Service Management Commands
# View running status
docker exec -it trend-radar python manage.py status

# Manually execute crawler once
docker exec -it trend-radar python manage.py run

# View real-time logs
docker exec -it trend-radar python manage.py logs

# Display current config
docker exec -it trend-radar python manage.py config

# Display output files
docker exec -it trend-radar python manage.py files

# Web server management (for browser access to generated reports)
docker exec -it trend-radar python manage.py start_webserver   # Start web server
docker exec -it trend-radar python manage.py stop_webserver    # Stop web server
docker exec -it trend-radar python manage.py webserver_status  # Check web server status

# View help info
docker exec -it trend-radar python manage.py help

# Restart container
docker restart trend-radar

# Stop container
docker stop trend-radar

# Remove container (keep data)
docker rm trend-radar
💡 Web Server Notes:
- After starting, access latest report at
http://localhost:8080- Access historical reports via directory navigation (e.g.,
http://localhost:8080/2025-xx-xx/)- Port can be configured in
.envfile withWEBSERVER_PORTparameter- Auto-start: Set
ENABLE_WEBSERVER=truein.env- Security: Static files only, limited to output directory, localhost binding only
Data Persistence
Generated reports and data are saved in ./output directory by default. Data persists even if container is restarted or removed.
📊 Web Report Access Paths:
TrendRadar generates daily summary HTML reports to two locations simultaneously:
| File Location | Access Method | Use Case |
|---|---|---|
output/index.html |
Direct host access | Docker Deployment (via Volume mount, visible on host) |
index.html |
Root directory access | GitHub Pages (repository root, auto-detected by Pages) |
output/YYYY-MM-DD/html/当日汇总.html |
Historical reports | All environments (archived by date) |
Local Access Examples:
# Method 1: Via Web Server (recommended, Docker environment)
# 1. Start web server
docker exec -it trend-radar python manage.py start_webserver
# 2. Access in browser
http://localhost:8080                           # Access latest report (default index.html)
http://localhost:8080/2025-xx-xx/               # Access reports for specific date
http://localhost:8080/2025-xx-xx/html/          # Browse all HTML files for that date

# Method 2: Direct file access (local environment)
open ./output/index.html             # macOS
start ./output/index.html            # Windows
xdg-open ./output/index.html         # Linux

# Method 3: Access historical archives
open ./output/2025-xx-xx/html/当日汇总.html
Why two index.html files?
output/index.html: Docker Volume mounted to host, can be opened locallyindex.html: Pushed to repository by GitHub Actions, auto-deployed by GitHub Pages
💡 Tip: Both files have identical content, choose either one to access.
Troubleshooting
# Check container status
docker inspect trend-radar

# View container logs
docker logs --tail 100 trend-radar

# Enter container for debugging
docker exec -it trend-radar /bin/bash

# Verify config files
docker exec -it trend-radar ls -la /app/config/
MCP Service Deployment (AI Analysis Feature)
If you need to use AI analysis features, you can deploy the standalone MCP service container.
Architecture Description:
flowchart TB
    subgraph trend-radar["trend-radar"]
        A1[Scheduled News Fetching]
        A2[Push Notifications]
    end

    subgraph trend-radar-mcp["trend-radar-mcp"]
        B1[127.0.0.1:3333]
        B2[AI Analysis API]
    end

    subgraph shared["Shared Volume"]
        C1["config/ (ro)"]
        C2["output/ (ro)"]
    end

    trend-radar --> shared
    trend-radar-mcp --> shared
Quick Start:
Use docker compose to start both news push and MCP services:
# Method 1: Clone project (Recommended)
git clone https://github.com/sansan0/TrendRadar.git
cd TrendRadar/docker
docker compose up -d

# Method 2: Download docker-compose.yml separately
mkdir trendradar && cd trendradar
wget https://raw.githubusercontent.com/sansan0/TrendRadar/master/docker/docker-compose.yml
wget https://raw.githubusercontent.com/sansan0/TrendRadar/master/docker/.env
mkdir -p config output
# Download config files
wget https://raw.githubusercontent.com/sansan0/TrendRadar/master/config/config.yaml -P config/
wget https://raw.githubusercontent.com/sansan0/TrendRadar/master/config/frequency_words.txt -P config/
# Modify volume paths in docker-compose.yml: ../config -> ./config, ../output -> ./output
docker compose up -d

# Check running status
docker ps | grep trend-radar
Start MCP Service Separately:
# Linux/Mac
docker run -d --name trend-radar-mcp \
  -p 127.0.0.1:3333:3333 \
  -v $(pwd)/config:/app/config:ro \
  -v $(pwd)/output:/app/output:ro \
  -e TZ=Asia/Shanghai \
  wantcat/trendradar-mcp:latest

# Windows PowerShell
docker run -d --name trend-radar-mcp `
  -p 127.0.0.1:3333:3333 `
  -v ${PWD}/config:/app/config:ro `
  -v ${PWD}/output:/app/output:ro `
  -e TZ=Asia/Shanghai `
  wantcat/trendradar-mcp:latest
⚠️ Note: Ensure
config/andoutput/folders exist in current directory with config files and news data before running.
Verify Service:
# Check MCP service health
curl http://127.0.0.1:3333/mcp

# View MCP service logs
docker logs -f trend-radar-mcp
Configure in AI Clients:
After MCP service starts, configure based on your client:
Cherry Studio (Recommended, GUI config):
- Settings → MCP Server → Add
- Type:
streamableHttp - URL:
http://127.0.0.1:3333/mcp
Claude Desktop / Cline (JSON config):
{
  "mcpServers": {
    "trendradar": {
      "url": "http://127.0.0.1:3333/mcp",
      "type": "streamableHttp"
    }
  }
}
💡 Tip: MCP service only listens on local port (127.0.0.1) for security. For remote access, configure reverse proxy and authentication yourself.
7. Report Configuration
👉 Click to expand: Report-Related Parameter Configuration
Configuration Location: report section in config/config.yaml
report:
  mode: "daily"                    # Push mode
  rank_threshold: 5                # Ranking highlight threshold
  sort_by_position_first: false    # Sorting priority
  max_news_per_keyword: 0          # Maximum display count per keyword
  reverse_content_order: false     # Content order configuration
Configuration Details
| Config Item | Type | Default | Description |
|---|---|---|---|
mode |
string | daily |
Push mode, options: daily/incremental/current, see Push Mode Details |
rank_threshold |
int | 5 |
Ranking highlight threshold, news with rank ≤ this value will be displayed in bold |
sort_by_position_first |
bool | false |
Sorting priority: false=sort by news count, true=sort by config position |
max_news_per_keyword |
int | 0 |
Maximum display count per keyword, 0=unlimited |
reverse_content_order |
bool | false |
Content order: false=trending keywords stats first, true=new trending news first |
Content Order Configuration (v3.5.0 New)
Controls display order of two content sections in push messages and HTML reports:
| Config Value | Display Order |
|---|---|
false (default) |
① Trending Keywords Stats → ② New Trending News |
true |
① New Trending News → ② Trending Keywords Stats |
Use Cases:
false(default): Suitable for users focusing on keyword match results, view categorized stats firsttrue: Suitable for users focusing on latest updates, prioritize viewing new trending topics
Docker Environment Variable:
REVERSE_CONTENT_ORDER=true
Sorting Priority Configuration
Example Scenario: Config order A, B, C, news count A(3), B(10), C(5)
| Config Value | Display Order | Use Case |
|---|---|---|
false (default) |
B(10) → C(5) → A(3) | Focus on popularity trends |
true |
A(3) → B(10) → C(5) | Focus on personal priority |
Docker Environment Variables:
SORT_BY_POSITION_FIRST=true
MAX_NEWS_PER_KEYWORD=10
8. Push Window Configuration
👉 Click to expand: Push Time Window Control Details
Configuration Location: notification.push_window section in config/config.yaml
notification:
  push_window:
    enabled: false                    # Whether to enable
    time_range:
      start: "20:00"                  # Start time (Beijing time)
      end: "22:00"                    # End time (Beijing time)
    once_per_day: true                # Push only once per day
Configuration Details
| Config Item | Type | Default | Description |
|---|---|---|---|
enabled |
bool | false |
Whether to enable push time window control |
time_range.start |
string | "20:00" |
Push window start time (Beijing time, HH:MM format) |
time_range.end |
string | "22:00" |
Push window end time (Beijing time, HH:MM format) |
once_per_day |
bool | true |
true=push only once per day within window, false=push every execution within window |
Use Cases
| Scenario | Configuration Example |
|---|---|
| Working Hours Push | start: "09:00", end: "18:00", once_per_day: false |
| Evening Summary Push | start: "20:00", end: "22:00", once_per_day: true |
| Lunch Break Push | start: "12:00", end: "13:00", once_per_day: true |
Important Notice
⚠️ GitHub Actions Users Note:
- GitHub Actions execution time is unstable, may have ±15 minutes deviation
- Time range should be at least 2 hours wide
- For precise timed push, recommend Docker deployment on personal server
Docker Environment Variables
PUSH_WINDOW_ENABLED=true
PUSH_WINDOW_START=09:00
PUSH_WINDOW_END=18:00
PUSH_WINDOW_ONCE_PER_DAY=false
Complete Configuration Examples
Scenario: Push once between 8-10 PM daily
notification:
  push_window:
    enabled: true
    time_range:
      start: "20:00"
      end: "22:00"
    once_per_day: true
Scenario: Push every hour during working hours
notification:
  push_window:
    enabled: true
    time_range:
      start: "09:00"
      end: "18:00"
    once_per_day: false
9. Execution Frequency Configuration
👉 Click to expand: Automatic Execution Frequency Settings
Configuration Location: schedule section in .github/workflows/crawler.yml
on:
  schedule:
    - cron: "0 * * * *"  # Run every hour
What is a Cron Expression?
Cron is a time-based job scheduler format, consisting of 5 parts: minute hour day month weekday
┌───────────── minute (0-59)
│ ┌───────────── hour (0-23)
│ │ ┌───────────── day (1-31)
│ │ │ ┌───────────── month (1-12)
│ │ │ │ ┌───────────── weekday (0-6, 0=Sunday)
│ │ │ │ │
* * * * *
Common Configuration Examples
| Desired Effect | Cron Expression | Description |
|---|---|---|
| Every hour | 0 * * * * |
Run at minute 0 of every hour (default) |
| Every 30 minutes | */30 * * * * |
Run every 30 minutes |
| Daily at 8 AM | 0 0 * * * |
UTC 0:00 = Beijing 8:00 AM |
| Working hours | */30 0-14 * * * |
Beijing 8:00-22:00, every 30 minutes |
| 3 times daily | 0 0,6,12 * * * |
Beijing 8:00, 14:00, 20:00 |
Important Notes
⚠️ Time Zone Note: GitHub Actions uses UTC time, Beijing time needs to subtract 8 hours
- Want Beijing 8:00 AM run → Set UTC 0:00
- Want Beijing 8:00 PM run → Set UTC 12:00
⚠️ Frequency Limit: GitHub has a limit on Actions execution count per account
- Recommendation: Don't set intervals shorter than 30 minutes
- Reason: Too frequent may be considered abuse, facing account ban risk
- Reality: GitHub Actions execution time has inherent deviation, setting too precise is meaningless
Modification Method
- Open your forked repository
- Find
.github/workflows/crawler.ymlfile - Click edit (pencil icon)
- Modify the expression in
cron: "0 * * * *" - Click "Commit changes" to save
10. Multiple Account Push Configuration
👉 Click to expand: Multiple Account Push Configuration Guide
Configuration Location: notification section in config/config.yaml
⚠️ Security Warning
GitHub Fork Users: DO NOT configure push information in
config.yaml!
- Risk:
config.yamlwill be committed to public Git repositories. Configuring push information (Webhook URLs, Tokens, etc.) will expose sensitive data- Recommended Methods:
- GitHub Actions Users → Use GitHub Secrets environment variables
- Docker Users → Use
.envfile configuration (.envis in.gitignoreand won't be committed)- Local Development Users: Can configure in
config.yaml(ensure it won't be pushed to public repositories)
Supported Channels
| Channel | Configuration Item | Pairing Required | Description |
|---|---|---|---|
| Feishu | feishu_url |
No | Multiple webhook URLs |
| DingTalk | dingtalk_url |
No | Multiple webhook URLs |
| WeWork | wework_url |
No | Multiple webhook URLs |
| Telegram | telegram_bot_token + telegram_chat_id |
✅ Yes | Token and chat_id quantities must match |
| ntfy | ntfy_topic + ntfy_token |
✅ Yes | Topic and token quantities must match (token optional) |
| Bark | bark_url |
No | Multiple push URLs |
| Slack | slack_webhook_url |
No | Multiple webhook URLs |
email_to |
- | Already supports multiple recipients (comma-separated), no modification needed |
Recommended Method 1: GitHub Actions Environment Variables
Configuration Location: GitHub Repo → Settings → Secrets and variables → Actions → Repository secrets
Basic Configuration Example:
# Multi-account quantity limit
MAX_ACCOUNTS_PER_CHANNEL=3

# Feishu multi-account (3 groups)
FEISHU_WEBHOOK_URL=https://hook1.feishu.cn/xxx;https://hook2.feishu.cn/yyy;https://hook3.feishu.cn/zzz

# DingTalk multi-account (2 groups)
DINGTALK_WEBHOOK_URL=https://oapi.dingtalk.com/xxx;https://oapi.dingtalk.com/yyy

# WeWork multi-account (2 groups)
WEWORK_WEBHOOK_URL=https://qyapi.weixin.qq.com/cgi-bin/webhook/send?key=xxx;https://qyapi.weixin.qq.com/cgi-bin/webhook/send?key=yyy

# Bark multi-account (2 devices)
BARK_URL=https://api.day.app/key1;https://api.day.app/key2

# Slack multi-account (2 channels)
SLACK_WEBHOOK_URL=https://hooks.slack.com/xxx;https://hooks.slack.com/yyy
Paired Configuration Examples (Telegram and ntfy):
Telegram Paired Configuration
# ✅ Correct: 2 tokens correspond to 2 chat_ids
TELEGRAM_BOT_TOKEN=123456:AAA-BBB;789012:CCC-DDD
TELEGRAM_CHAT_ID=-100111;-100222

# ❌ Incorrect: quantities don't match, push will be skipped
TELEGRAM_BOT_TOKEN=token1;token2;token3
TELEGRAM_CHAT_ID=id1;id2
Note: The quantities of token and chat_id must match exactly, otherwise the channel push will be skipped.
ntfy Paired Configuration
# ✅ Correct: 3 topics, only the 2nd needs a token
NTFY_TOPIC=topic1;topic2;topic3
NTFY_TOKEN=;token_for_topic2;

# ✅ Correct: 2 topics both need tokens
NTFY_TOPIC=topic1;topic2
NTFY_TOKEN=token1;token2

# ❌ Incorrect: topic and token quantities don't match
NTFY_TOPIC=topic1;topic2
NTFY_TOKEN=token1;token2;token3
Notes:
- If a topic doesn't need a token, leave it empty at the corresponding position (between two semicolons)
- The quantities of
topicandtokenmust match
Recommended Method 2: Docker Environment Variables (.env)
Configuration Location: docker/.env file in project root directory
Basic Configuration Example:
# Multi-account quantity limit
MAX_ACCOUNTS_PER_CHANNEL=3

# Feishu multi-account (3 groups)
FEISHU_WEBHOOK_URL=https://hook1.feishu.cn/xxx;https://hook2.feishu.cn/yyy;https://hook3.feishu.cn/zzz

# DingTalk multi-account (2 groups)
DINGTALK_WEBHOOK_URL=https://oapi.dingtalk.com/xxx;https://oapi.dingtalk.com/yyy

# WeWork multi-account (2 groups)
WEWORK_WEBHOOK_URL=https://qyapi.weixin.qq.com/cgi-bin/webhook/send?key=xxx;https://qyapi.weixin.qq.com/cgi-bin/webhook/send?key=yyy

# Bark multi-account (2 devices)
BARK_URL=https://api.day.app/key1;https://api.day.app/key2

# Slack multi-account (2 channels)
SLACK_WEBHOOK_URL=https://hooks.slack.com/xxx;https://hooks.slack.com/yyy
Paired Configuration Examples (Telegram and ntfy):
Telegram Paired Configuration
# ✅ Correct: 2 tokens correspond to 2 chat_ids
TELEGRAM_BOT_TOKEN=123456:AAA-BBB;789012:CCC-DDD
TELEGRAM_CHAT_ID=-100111;-100222

# ❌ Incorrect: quantities don't match, push will be skipped
TELEGRAM_BOT_TOKEN=token1;token2;token3
TELEGRAM_CHAT_ID=id1;id2
Note: The quantities of token and chat_id must match exactly, otherwise the channel push will be skipped.
ntfy Paired Configuration
# ✅ Correct: 3 topics, only the 2nd needs a token
NTFY_TOPIC=topic1;topic2;topic3
NTFY_TOKEN=;token_for_topic2;

# ✅ Correct: 2 topics both need tokens
NTFY_TOPIC=topic1;topic2
NTFY_TOKEN=token1;token2

# ❌ Incorrect: topic and token quantities don't match
NTFY_TOPIC=topic1;topic2
NTFY_TOKEN=token1;token2;token3
Notes:
- If a topic doesn't need a token, leave it empty at the corresponding position (between two semicolons)
- The quantities of
topicandtokenmust match
Push Behavior Description
- Independent Push: Each account sends independently, one failure doesn't affect other accounts
- Partial Success: As long as one account sends successfully, the overall result is considered successful
- Log Differentiation: Multi-account logs show "Account 1", "Account 2", etc.
- Batch Interval: Multi-account increases total send time (each account independently calculates batch interval)
FAQ
Q1: What happens if more than 3 accounts are configured?
The system will automatically truncate to the configured maximum quantity and output warning logs. You can adjust the limit via max_accounts_per_channel.
⚠️ Special Note for GitHub Actions Users:
- Not recommended to configure too many accounts (suggest no more than 3), which may cause:
- Trigger GitHub Actions rate limits: Frequent network requests may be identified as abnormal behavior
- Affect Workflow execution time: Multi-account pushing will extend runtime and may exceed free quotas
- Potential account risks: Excessive use of GitHub Actions resources may affect account status
- Recommended Practices:
- Use
max_accounts_per_channel: 3or lower values - Adjust Cron execution frequency (e.g., change from hourly to every 2-3 hours)
- Prioritize the most important push channels and avoid configuring too many accounts
- Use
Q2: Will multi-accounts affect push speed?
Yes. Each account sends independently, total time = number of accounts × single account send time. Recommend controlling the number of accounts.
Q3: How can local development users configure in config.yaml?
If you are doing local development and will not push code to public repositories, you can configure directly in config/config.yaml:
notification:
  enable_notification: true
  max_accounts_per_channel: 3

  webhooks:
    feishu_url: "https://hook1.feishu.cn/xxx;https://hook2.feishu.cn/yyy"
    telegram_bot_token: "token1;token2"
    telegram_chat_id: "id1;id2"
⚠️ Important Reminder:
- Ensure
config/config.yamlis in.gitignore(if you will commit code) - Or only use in local development environment, never commit to public repositories
11. Storage Configuration (v4.0.0 New)
👉 Click to expand: Storage Configuration Guide
Storage Backend Selection
TrendRadar v4.0.0 introduces multi-backend storage architecture, supporting automatic backend selection or manual specification:
| Configuration Value | Description | Applicable Scenarios |
|---|---|---|
auto (default) |
Auto-select backend: GitHub Actions→R2, other environments→Local | Most users (recommended) |
local |
Force use of local SQLite | Docker/local deployment |
r2 |
Force use of Cloudflare R2 | Cloud storage required |
Configuration Location:
- GitHub Actions: Set
STORAGE_BACKENDenvironment variable in GitHub Secrets - Docker: Configure
STORAGE_BACKEND=localin.envfile - Local: Add
STORAGE_BACKENDin environment variables or use auto mode
Database Structure Optimization (v4.0.0)
v4.0.0 made significant optimizations to database structure, removing redundant fields and improving data normalization:
1. Removed Redundant Fields
Removed the following redundant fields from news table:
| Field Name | Removal Reason | Alternative |
|---|---|---|
source_name |
Duplicate with platform name | Get via platforms table JOIN query |
crawl_date |
Duplicate with file path date | Infer from file path timestamp |
Migration Notes: Old databases are incompatible, see Breaking Changes section
2. New Platforms Table
Added platforms table for unified management of platform information:
CREATE TABLE IF NOT EXISTS platforms (
    id TEXT PRIMARY KEY,     -- Platform ID (immutable, e.g., 'zhihu', 'weibo')
    name TEXT NOT NULL,      -- Platform display name (mutable, e.g., 'Zhihu', 'Weibo')
    enabled INTEGER DEFAULT 1 -- Whether enabled (1=enabled, 0=disabled)
);
Design Advantages:
idfield is immutable, maintains data consistencynamefield is mutable, supports internationalization and customization- Historical data remains valid when modifying platform names
3. Crawl Source Status Normalization
Replaced original comma-separated string storage successful_sources field with normalized crawl_source_status table:
CREATE TABLE IF NOT EXISTS crawl_source_status (
    id INTEGER PRIMARY KEY AUTOINCREMENT,
    file_path TEXT NOT NULL,           -- File path (e.g., 'output/2025-12-09/news.db')
    platform_id TEXT NOT NULL,         -- Platform ID (foreign key to platforms.id)
    success INTEGER NOT NULL,          -- Whether crawl succeeded (1=success, 0=failed)
    crawl_time TIMESTAMP DEFAULT CURRENT_TIMESTAMP,
    FOREIGN KEY (platform_id) REFERENCES platforms(id)
);
Design Advantages:
- Supports efficient SQL queries (e.g., calculate success rate by platform)
- Easy statistics and analysis (no string splitting required)
- Normalized structure, avoids data redundancy
4. File Path Format Standardization
Old Format: output/2025年12月09日/news_14-30.txt
New Format: output/2025-12-09/news.db
Changes:
- Date format: Chinese format → ISO 8601 standard format
- Filename: Multiple time-stamped TXT files → single SQLite database file
- Extension:
.txt→.db
Advantages:
- Cross-platform compatibility (avoids Chinese path issues)
- Easier programmatic parsing
- International standard, better maintainability
Remote Cloud Storage Configuration
When using remote cloud storage (required for GitHub Actions environment), configure the following environment variables:
| Environment Variable | Description | Required | Example Value |
|---|---|---|---|
S3_BUCKET_NAME |
Bucket name | ✅ Yes | trendradar-data |
S3_ACCESS_KEY_ID |
Access key ID | ✅ Yes | abc123... |
S3_SECRET_ACCESS_KEY |
Access key | ✅ Yes | xyz789... |
S3_ENDPOINT_URL |
S3 API endpoint | ✅ Yes | https://<account-id>.r2.cloudflarestorage.com |
S3_REGION |
Region (optional) | ❌ No | auto |
Configuration Method:
- GitHub Actions: Configure in GitHub Secrets (see Quick Start - Remote Storage Configuration)
- Docker/Local: Configure in
.envfile (remote storage is optional)
Data Cleanup Strategy
v4.0.0 added automatic data cleanup feature, supporting scheduled cleanup of old data:
Configuration Items: LOCAL_RETENTION_DAYS and REMOTE_RETENTION_DAYS
| Configuration Value | Description |
|---|---|
0 (default) |
Disable cleanup, keep all data |
Positive integer (e.g., 30) |
Only keep recent N days of data, auto-delete old data |
Configuration Method:
# GitHub Actions: Configure in GitHub Secrets
LOCAL_RETENTION_DAYS=30
REMOTE_RETENTION_DAYS=30

# Docker: Configure in .env file
LOCAL_RETENTION_DAYS=30
REMOTE_RETENTION_DAYS=30

# Local: Add to environment variables
export LOCAL_RETENTION_DAYS=30
Cleanup Rules:
- Cleanup executes during each crawl task
- Local: Deletes
output/YYYY-MM-DD/directories older than N days - Remote: Deletes cloud objects older than N days (e.g.,
news/2025-11-10.db)
Timezone Configuration
v4.0.0 added timezone configuration support, using IANA standard time zone names:
Configuration Item: TIMEZONE
| Configuration Value | Description | Example |
|---|---|---|
| Not set (default) | Use UTC+0 | - |
| IANA time zone name | Specify time zone | Asia/Shanghai, America/New_York, Europe/London |
Configuration Method:
# GitHub Actions: Configure in GitHub Secrets
TIMEZONE=Asia/Shanghai

# Docker: Configure in .env file
TIMEZONE=Asia/Shanghai

# Local: Add to environment variables
export TIMEZONE=Asia/Shanghai
Common IANA Time Zones:
- China:
Asia/Shanghai - United States East:
America/New_York - United States West:
America/Los_Angeles - United Kingdom:
Europe/London - Japan:
Asia/Tokyo
Breaking Changes (v4.0.0)
⚠️ Important Notice: v4.0.0 made breaking changes to database structure, old databases are incompatible
Impact:
- Cannot directly read v3.x version data
- Need to re-crawl data to build new database
- No automatic migration tool provided
Recommendations:
- Fresh Start: Recommended to start from scratch to accumulate data
- Keep Historical Data: If need to preserve v3.x historical data, can rename old
output/directory (e.g.,output_v3_backup/) before running new version
Data Format Comparison:
| Item | v3.x | v4.0.0 |
|---|---|---|
| File path format | output/2025年12月09日/ |
output/2025-12-09/ |
| Data file | Multiple news_HH-MM.txt files |
Single news.db file |
| Database fields | Contains source_name, crawl_date |
Removed redundant fields |
| Platform management | No independent table | Added platforms table |
| Crawl status | Comma-separated string | Normalized crawl_source_status table |
🤖 AI Analysis
TrendRadar v3.0.0 added MCP (Model Context Protocol) based AI analysis feature, allowing natural language conversations with news data for deep analysis.
⚠️ Important Notice Before Use
Critical: AI features require local news data support
AI analysis does not query real-time online data directly, but analyzes locally accumulated news data (stored in the output folder)
Usage Instructions:
-
Built-in Test Data: The
outputdirectory includes news data from November 1-15, 2025 by default for quick feature testing -
Query Limitations:
- ✅ Only query data within available date range (Nov 1-15)
- ❌ Cannot query real-time news or future dates
-
Getting Latest Data:
- Test data is for quick experience only, recommend deploying the project yourself to get real-time data
- Follow Quick Start to deploy and run the project
- After accumulating news data for at least 1 day, you can query the latest trending topics
1. Quick Deployment
Cherry Studio provides GUI config interface, 5-minute quick deployment, complex parts are one-click install.
Illustrated Deployment Tutorial: Now updated to my WeChat Official Account (see FAQ & Support), reply "mcp" to get
Detailed Deployment Tutorial: README-Cherry-Studio.md
Deployment Mode Description:
- STDIO Mode (Recommended): One-time configuration, no need to reconfigure later. The illustrated deployment tutorial only demonstrates this mode's configuration.
- HTTP Mode (Alternative): If STDIO mode configuration encounters issues, you can use HTTP mode. This mode's configuration is basically the same as STDIO, but only requires copy-pasting one line, less error-prone. The only thing to note is that you need to manually start the service before each use. For details, refer to the HTTP mode section at the bottom of README-Cherry-Studio.md.
2. Learning to Talk with AI
Detailed Conversation Tutorial: README-MCP-FAQ.md
Question Effect:
👉 Click to expand: View AI Conversation Example
💡 Tip: Actually not recommended to ask multiple questions at once. If your chosen AI model cannot even sequentially call as shown below, suggest switching models.

🔌 MCP Clients
TrendRadar MCP service supports standard Model Context Protocol (MCP), can connect to various AI clients supporting MCP for smart analysis.
Supported Clients
Note:
- Replace
/path/to/TrendRadarwith your actual project path - Windows paths use double backslashes:
C:\\Users\\YourName\\TrendRadar - Remember to restart after saving
👉 Click to expand: Claude Desktop
Config File Method
Edit Claude Desktop's MCP config file:
Windows:
%APPDATA%\Claude\claude_desktop_config.json
Mac:
~/Library/Application Support/Claude/claude_desktop_config.json
Config Content:
{
  "mcpServers": {
    "trendradar": {
      "command": "uv",
      "args": [
        "--directory",
        "/path/to/TrendRadar",
        "run",
        "python",
        "-m",
        "mcp_server.server"
      ],
      "env": {},
      "disabled": false,
      "alwaysAllow": []
    }
  }
}
👉 Click to expand: Cursor
Method 1: HTTP Mode
-
Start HTTP Service:
# Windows start-http.bat # Mac/Linux ./start-http.sh -
Configure Cursor:
Project Level Config (Recommended): Create
.cursor/mcp.jsonin project root:{ "mcpServers": { "trendradar": { "url": "http://localhost:3333/mcp", "description": "TrendRadar News Trending Aggregation Analysis" } } }Global Config: Create
~/.cursor/mcp.jsonin user directory (same content) -
Usage Steps:
- Restart Cursor after saving config
- Check connected tools in chat interface "Available Tools"
- Start using:
Search today's "AI" related news
Method 2: STDIO Mode (Recommended)
Create .cursor/mcp.json:
{
  "mcpServers": {
    "trendradar": {
      "command": "uv",
      "args": [
        "--directory",
        "/path/to/TrendRadar",
        "run",
        "python",
        "-m",
        "mcp_server.server"
      ]
    }
  }
}
👉 Click to expand: VSCode (Cline/Continue)
Cline Configuration
Add in Cline's MCP settings:
HTTP Mode:
{
  "trendradar": {
    "url": "http://localhost:3333/mcp",
    "type": "streamableHttp",
    "autoApprove": [],
    "disabled": false
  }
}
STDIO Mode (Recommended):
{
  "trendradar": {
    "command": "uv",
    "args": [
      "--directory",
      "/path/to/TrendRadar",
      "run",
      "python",
      "-m",
      "mcp_server.server"
    ],
    "type": "stdio",
    "disabled": false
  }
}
Continue Configuration
Edit ~/.continue/config.json:
{
  "experimental": {
    "modelContextProtocolServers": [
      {
        "transport": {
          "type": "stdio",
          "command": "uv",
          "args": [
            "--directory",
            "/path/to/TrendRadar",
            "run",
            "python",
            "-m",
            "mcp_server.server"
          ]
        }
      }
    ]
  }
}
Usage Examples:
Analyze recent 7 days "Tesla" popularity trend
Generate today's trending summary report
Search "Bitcoin" related news and analyze sentiment
👉 Click to expand: Claude Code CLI
HTTP Mode Configuration
# 1. Start HTTP service
# Windows: start-http.bat
# Mac/Linux: ./start-http.sh

# 2. Add MCP server
claude mcp add --transport http trendradar http://localhost:3333/mcp

# 3. Verify connection (ensure service started)
claude mcp list
Usage Examples
# Query news
claude "Search today's Zhihu trending news, top 10"

# Trend analysis
claude "Analyze 'artificial intelligence' topic popularity trend for the past week"

# Data comparison
claude "Compare Zhihu and Weibo platform attention on 'Bitcoin'"
👉 Click to expand: MCP Inspector (Debug Tool)
MCP Inspector is the official debug tool for testing MCP connections:
Usage Steps
-
Start TrendRadar HTTP Service:
# Windows start-http.bat # Mac/Linux ./start-http.sh -
Start MCP Inspector:
npx @modelcontextprotocol/inspector -
Connect in Browser:
- Visit:
http://localhost:3333/mcp - Test "Ping Server" function to verify connection
- Check "List Tools" returns 14 tools:
- Date Parsing: resolve_date_range
- Basic Query: get_latest_news, get_news_by_date, get_trending_topics
- Smart Search: search_news, search_related_news_history
- Advanced Analysis: analyze_topic_trend, analyze_data_insights, analyze_sentiment, find_similar_news, generate_summary_report
- System Management: get_current_config, get_system_status, trigger_crawl
- Visit:
👉 Click to expand: Other MCP-Compatible Clients
Any client supporting Model Context Protocol can connect to TrendRadar:
HTTP Mode
Service Address: http://localhost:3333/mcp
Basic Config Template:
{
  "name": "trendradar",
  "url": "http://localhost:3333/mcp",
  "type": "http",
  "description": "News Trending Aggregation Analysis"
}
STDIO Mode (Recommended)
Basic Config Template:
{
  "name": "trendradar",
  "command": "uv",
  "args": [
    "--directory",
    "/path/to/TrendRadar",
    "run",
    "python",
    "-m",
    "mcp_server.server"
  ],
  "type": "stdio"
}
Notes:
- Replace
/path/to/TrendRadarwith actual project path - Windows paths use backslash escape:
C:\\Users\\... - Ensure project dependencies installed (ran setup script)
☕ FAQ & Support
If you want to support this project, you can search Tencent Charity on WeChat and donate to Education Support Programs as you wish
Thanks to those who participated in the one-yuan donation! You are listed in the Acknowledgments at the top. Your support gives more motivation to open source maintenance. Personal donation QR code has been removed.
- GitHub Issues: Suitable for targeted answers. Please provide complete info when asking (screenshots, error logs, system environment, etc.)
- WeChat Official Account: Suitable for quick consultation. Suggest priority to communicate in public comment area of related articles. If private message, please use polite language 😉
- 💡 Deployment successful? Come to our official account to share your experience! Your likes and suggestions are the driving force for continuous updates~
| WeChat Official Account |
|---|
 |
🪄 Sponsors
🤖 302.AI - Enterprise AI Resource Platform
302.AI is a pay-as-you-go enterprise-level AI resource platform Providing the latest and most comprehensive AI models and APIs on the market, plus various ready-to-use online AI applications

👉 Click to expand: 302.AI Usage Tutorial
Step 1: Get API Key
- After registration, go to Management Dashboard at top right
- Click API Keys on the left
- Find default API KEY at page bottom, click eye icon to view, then copy (⚠️ Note: Don't click the copy button on the far right)
Step 2: Configure in Cherry Studio
- Open Cherry Studio, go to settings
- Select "302.AI" as model provider
- Paste the API Key you just copied
- Click Manage, now you can use all supported AI models
Tip: Cherry Studio has natively integrated 302.AI, you can see the complete model list after configuration.
Q: How long does $1 free credit last? A: Depends on usage frequency and model selection, can run multiple test sessions.
Q: What after free credit runs out? A: You can top up as needed, pay-as-you-go. Major AI model prices are now relatively affordable.
Tracking so many trending topics daily, writing reports, replying messages making your wrists tired?
Try「FlashSpeak」AI Voice Input - Speak instead of type, 4x faster ⚡
On-device Model • Lightning Fast • Absolute Privacy • Mac/Win Support
From reading trends to content output, double your efficiency 👇
Common Questions
👉 Click to expand: Q1: HTTP Service Cannot Start?
Check Steps:
-
Confirm port 3333 is not occupied:
# Windows netstat -ano | findstr :3333 # Mac/Linux lsof -i :3333 -
Check if project dependencies installed:
# Re-run install script # Windows: setup-windows.bat or setup-windows-en.bat # Mac/Linux: ./setup-mac.sh -
View detailed error logs:
uv run python -m mcp_server.server --transport http --port 3333 -
Try custom port:
uv run python -m mcp_server.server --transport http --port 33333
👉 Click to expand: Q2: Client Cannot Connect to MCP Service?
Solutions:
-
STDIO Mode:
- Confirm UV path correct (run
which uvorwhere uv) - Confirm project path correct and no Chinese characters
- Check client error logs
- Confirm UV path correct (run
-
HTTP Mode:
- Confirm service started (visit
http://localhost:3333/mcp) - Check firewall settings
- Try using 127.0.0.1 instead of localhost
- Confirm service started (visit
-
General Checks:
- Restart client application
- Check MCP service logs
- Use MCP Inspector to test connection
👉 Click to expand: Q3: Tool Call Failed or Returns Error?
Possible Reasons:
-
Data Does Not Exist:
- Confirm crawler has run (have output directory data)
- Check query date range has data
- Check available dates in output directory
-
Parameter Error:
- Check date format:
YYYY-MM-DD - Confirm correct platform ID:
zhihu,weibo, etc. - See parameter descriptions in tool docs
- Check date format:
-
Config Issues:
- Confirm
config/config.yamlexists - Confirm
config/frequency_words.txtexists - Check config file format is correct
- Confirm
📚 Related Projects
4 Related Articles (Chinese):
- Comment here for mobile Q&A by project author
- Breaking 1000 stars in 2 months - My GitHub project promotion experience
- Important notes for running this project via GitHub fork
- How to write WeChat Official Account or news articles based on this project
AI Development:
- If you have niche requirements, you can develop based on my project yourself, even with zero programming experience
- All my open-source projects use my own AI-assisted software to improve development efficiency, this tool is now open-source
- Core Function: Quickly filter project code to feed AI, you just need to add personal requirements
- Project Address: https://github.com/sansan0/ai-code-context-helper
Other Projects
📍 Chairman Mao's Footprint Map - Interactive dynamic display of complete trajectory 1893-1976. Welcome comrades to contribute data
Bilibili Comment Data Visualization Analysis Software
Project Workflow Diagram
flowchart TD
    A[👤 User Start] --> B{🚀 Choose Deployment}

    B -->|Cloud Deployment| C1[🍴 Fork to GitHub]
    B -->|Local Deployment| C2[🐳 Docker Deploy]

    C1 --> D[⚙️ Configure Notification<br/>Multiple channels supported]
    C2 --> D

    D --> E[Choose method:<br/>📱WeWork 💬Feishu 🔔DingTalk<br/>📟Telegram 📧Email]

    E --> F[🔑 Fill notification params<br/>GitHub Secrets or Env Vars]

    F --> G[📝 Configure keywords<br/>config/frequency_words.txt<br/>Normal/Required+/Filter!]

    G --> H[🎯 Choose mode<br/>config/config.yaml]

    H --> H1[📋 daily - Daily summary<br/>Scheduled push all matches]
    H --> H2[📰 current - Current rankings<br/>Scheduled push latest]
    H --> H3[📈 incremental - Incremental<br/>Push only new content]

    H1 --> I[Optional: Push time window<br/>⏰ Limit push time range]
    H2 --> I
    H3 --> I

    I --> J[✅ Config Complete]

    J --> K[🤖 Auto Run]

    K --> L[🕷️ Crawl 11+ platforms]
    L --> M[🔍 Keyword filtering]
    M --> N[⚖️ Weight sorting<br/>Rank 60% + Freq 30% + Hot 10%]
    N --> O[📊 Generate reports<br/>HTML + Push messages]
    O --> P[📱 Multi-channel push]

    P --> Q[🎉 Receive precise push<br/>Say goodbye to info overload]

    style A fill:#e3f2fd
    style B fill:#f3e5f5
    style D fill:#fff3e0
    style F fill:#fff9c4
    style G fill:#e8f5e9
    style H fill:#e0f2f1
    style I fill:#fce4ec
    style O fill:#e1bee7
    style Q fill:#c8e6c9
📄 License
GPL-3.0 License